Gas tank cleanup and sealing
The gas tank had waited in the chicken coop for two years. That was long enough to take on a couple of boarders — mice who built a nice soft nest behind an inside  baffle. In spite of the fact that the gas tank was bone dry from the first day we got the car, I know that mice hadn’t invaded until we took possession. The nest I pulled out piece by piece and sucked out with my shop vacuum was made of our brand of paper towel and a cotton swab or two that had been lying around. I had to use some wire to fish out the little bits. Time to set more traps, I guess.
I glanced inside the tank when we put it into storage, and I recall thinking that it was pretty rusty, though I was also happy that the tank was completely empty and had been for some time. Perhaps it is a matter of perspective now, but looking at it after two years of repairing other (worse?) rust made it seem a little better. The rust inside was scary nonetheless. There was a welded repair that had been covered with blue silicone sealer. I recall the previous owner pointing to some blue stuff and saying “Kreem?” but I have to admit that “Kreem” didn’t make much sense to me then. Now I know it is a type of gas tank sealer. Our closer look inside the tank showed us that the tank had never before been treated with a gas tank sealer. That fact simplified our work, since we wouldn’t have to remove a previous sealer to apply our own.
The underside of the tank, on the corner nearest the threaded hole for the fuel sump, had been repaired by cutting out a rusted area and patching it. The rest of the tank wall was unmolested and solid. The rust repair was probably done at the same time as the “repair” of the fuel sump hole on the trunk floor that we redid. This area of the E-type is commonly rusted, I’ve heard. It can collect water, since it is in close proximity to a hole fairly near the pavement and since Jaguar apparently used jute pads to soundproof. The jute pads were situated between the gas tank and the floor of the trunk. Unfortunately, they soaked up moisture and eventually promoted rust.
Bottom line: We didn’t need to do rust damage repair, though sealing and removal of lesser rust deposits were still needed.
I decided to use POR-15’s “US Standard Fuel Tank Sealer” kit. I’d read positive reviews, and I’ve been overall happy with other POR-15 products I’ve used. I know that the rust protection coating is mighty tough stuff, and I figured the sealer would be tough, too. Also, I was attracted by the simplicity of buying a kit that included everything I’d need. Cost was in line with what I expected: $50-$75. My kit arrived with two quarts of “Marine Clean” detergent, a quart of “Metal Ready” rust converter and metal etcher, a quart of sealer, and a large-ish container of fuel treatment, that I won’t use until I actually put gas into the tank. A single letter-sized sheet contains all of the instructions. In short, you clean the tank thoroughly, convert any remaining rust and etch the steel, and then coat with the sealer. (See the sidebar for all the details of our sealing job.)
Since I wanted to make the most out of the detergent that came from POR-15, I decided to do a pre-cleaning of the inside of the tank. There was no sense in pouring in the special detergent to do what regular old “industrial strength” degreaser-detergent would do. To that end, I used a 1:1 dilution of Kirkland brand (yes, it came from Costco)  “industrial/commercial” degreaser-detergent. This stuff is colored a flourescent-like green. I’ve used it to degrease parts and I’ve even used it — with spotty results — to clean items that were to be zinc plated. It has worked very well to remove grits and greasy deposits. I used the regular degreaser in the same manner that the POR-15 folks recommended using their “Marine Clean” detergent. The first cleaning really took out a lot of junk, both loose chunks of grit and flaked rust and dissolved goo. The detergent mix came out looking like eight-hour old espresso. After a clean water rinse, I redid it. The second batch of detergent came out signficantly more clean, but still definitely brown. The third batch came out virtually the same color as it went in (see the left half of the comparison picture in the sidebar), so I figured that the detergent had done as much as it could.
At that point, I began using the “Marine Clean.” Now, “Marine Clean” is a clear liquid, and the POR-15 people claim that it dissolves varnishes and residues that result from oxidizing fuels. Apparently this works in gas lines as well as gas tanks. I actually wasn’t expecting the “Marine Clean” to get as much out of the tank as it in fact did, since I’d already cleaned the tank with some also pretty tough detergent. That “Marine Clean” really works — the first 1:1 dilution came out significantly brown, indicating it was at least dissolving what my other detergent couldn’t. The second dilution also came out somewhat brown. One thing that was a bit unsual was that the instructions suggested that there was a third application of the “Marine Clean,” but my kit contained two quarts of the stuff. I figured that the POR-15 people decided that three was overkill and two would suffice.
The test of the relative strength of a “industrial” degreaser-detergent and the POR-15 “Marine Clean” detergent was really the only surprise in the process of sealing the gas tank. The rest of the process went without much to note.
After the inside was sealed, I painted the outside of the tank. I did decide to mask the areas where the fuel pump and the fuel level sensor attach as well as the threads for the fuel sump. These now are clean metal. I am thinking about installing a different (more dependable?) fuel pump, though I’m not sure what type, submersible or not. That is a question I do not need to answer right now, however.
The gas tank looks nice. I’ll have to keep more rodent boarders from moving in!
Gas tank treatment, step-by-step using POR-15 Fuel Tank Sealer Kit
Pretty scary, I thought, when I first took a look at the inside of the gas tank. This area is the welded repair that must have been associated with the rusted out trunk. I think that the rusted out trunk floor became a problem when gas began to leak. The area immediately adjacent to the welded repair on the tank exterior had some pitting as well.
 The instructions for the tank kit said to clean the tank with the “Marine Clean” detergent, diluted 1:1. I decided to use some regular old “industrial degreaser-detergent” (purchased from Costco) to do the initial cleaning. This entailed sloshing around a 1:1 mixture of water and degreaser. I did this three times, and I let the detergent soak for about an hour in the tank. The first time the mixture came out a coffee-colored liquid. After a clean water rinse and another Costco-brand slosh, the detergent had done as much as it could. It came out almost completely the color it went in. The picture above shows the results on the interior — there were some results but the best was yet to come.
 The picture shows the last Costco-brand detergent and the first “Marine Clean” detergent mix. It’s pretty obvious that the Costco detergent had done its best. And the “Marine Clean” — which went in completely colorless — came out quite brown. The “Marine Clean” detergent is claimed to remove fuel residues and varnishes that appear in fuel tanks and fuel lines. I was skeptical, but I was pleasantly surprised by the result, especially after I had cleaned up as best as I could with other detergent.
 This shows the tank floor after two applications of the “Marine Clean” detergent. Although the instructions said that the final detergent soaking would pour out almost clean, that was not my experience. That second soak came out brownish, too. I’m assuming this second application was adequate, since a third quart of “Marine Clean” did not come in my kit, although the instructions mention a third application of the diluted detergent. What is shown here really amounts to a thin coating of rust. I could easily rub it off with my fingertips.
 After the inside is free of greases, oils, and varnish, the rust is converted with a product called “Metal Ready.” Basically, this converts iron oxide rust and etches the metal surface. This left (or, perhaps more accurately, replaced) the rust film with a grey film that came off just as easily as the rust. This picture shows the treated surface after it had been rinsed with clean water. The surface came quite clean, since you can see the brazed welds quite easily and the steel looks like steel.
 An old hair dryer served as the forced air source. It was perfect, since I just shoved it in a hole and turned it on. For the most part, I kept the dryer running without using the heater. Hot air went in about three hours all told, and it definitely heated the tank. Overall, I ran the hair dryer about ten hours. Completely drying the inside of the tank is very important, and the kit instructions especially stress this. The tank sealer will not adhere to a wet or moist tank wall.
 The POR-15 kit comes with a quart of fuel tank sealer, which looks to me to be the same stuff as POR-15 metal coating. Stinks the same, at least, and it looks pretty much the same, too. We duct taped the openings on the gas tank, poured the sealer into the very dry tank, and rotated it to make sure that the coating covered the entire interior surface. After that, we poured the excess out — about a pint remained. The kit instructions said to leave the can open, so that it wouldn’t explode (!), and that does make me think that the sealer is somehow different from POR-15 metal coatings, since those are resealable, at least for short term.
 The inside of the tank now looks like this. The POR-15 instructions say that you can repair larger holes with a fabric-like product and POR-15 sealer applied to the outside of the tank over the holes. Thank goodness we won’t need to do that kind of thing!
 which probably sustained some accident damage. (My initial observations, including a description of the way the damage was “repaired” or at least hidden, appear in a
  holes that are designed and intended to be used to make minor adjustments to the fit. But this catalogue is a good reference to have on the shelf. Terry’s Jaguar Parts has a good reputation as a parts supplier. They’ll send you a catalogue if you ask.
 the cataloging and data entry to get it all current. I’m hoping that rather than adding to the list of parts we can soon begin simply to update records with notations like “painted and ready for installation” — or even better: “installed”
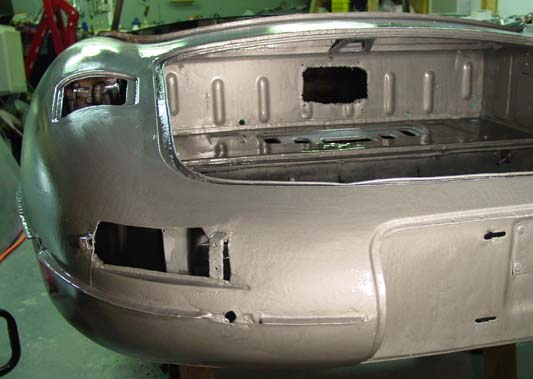
 16-gauge steel, and I suspect that will take a fair amount of time. We were able to get most of the bad dents out of the bonnet internals, though there are a few remains of creases that I’ll need to figure out what to do with. Since these are inside the bonnet, I’m less worried about getting everything straight and really tidy, though some of these items will be visible with the bonnet open. (The picture was taken after a second coat of POR-15 over the nose section after I sanded out the insect bodies that had embedded themselves into the paint.)
 I learned a lesson any schoolboy already knows: if you paint at night under the sky, insects get into the wet paint. And, yes, they did: loads of small gnats drowned in the POR-15 paint. I was able to put two coats of POR-15 on before I ran out. On Friday night I sanded the areas of the bonnet where fly lumps appeared, and now the bonnet is pretty smooth. It is definitely not ready for primer, though. Aaron and I will have to take out the unfortunate lumps and grooves that remain even still. It is almost to the point when a primer and block sanding will take care of everything, but now that the entire construct is a metal-silver it’s much easier to see what might need some more attention. We’ll probably block sand the sealing coat, and perhaps we’ll reapply POR-15 if need be.
 it meets the rest of the car body. Since the car is symmetrical, I just used the right sill as a pattern, reversing the bends and curves so that the piece would fit on the opposite side of the car. It took about four hours to get everything into shape. I still haven’t completed the piece, since I want to trial fit it before doing the final shaping along the ends and making the indentations and grooves on the lower part of the piece. I made sure to give myself some extra material, so that I had some leeway with the bends on the upper section of the piece. The sill I used as a pattern was about 12 inches wide, and I cut my piece 13 inches. It ended up that I will have to trim the lower section a little.
 near the bottom of the page). Now that we needed to take it all apart again, it was just a matter of removing the hardware and tapping the pieces with a rubber mallet. The two wings came off with a little tiny tap, and the lower section dropped from the center section without so much as a wiggle or twist. The parts look good. (The pictures to the right are small because the originals were very fuzzy. Making them smaller at least shows the gross results a little more clearly. Next time, I’ll look at the picture on the camera before continuing!)
 showed up to help flip the car back to “normal-side-up.” The day before, I had finished up with POR-15-ing the left floor panel and setting the rear floor stiffener to rights. I was anxious to get the car back to normal (at least in orientation). This wasn’t a tremendously productive weekend, but it did have that milestone.
 the front suspension and steering mechanisms intact. The entire structure needs to be completely taken apart so that the steering, the suspension assemblies and the three-part frame itself can be thoroughly cleaned and, as the case may be, renewed.
 I had to remove the upper shock absorber fastener in order to gain access to it. This fitting had three very stubborn bolts that took a great deal of penetrating fluid and many taps on the wrench to remove. I was careful not to be too free with my hammer, since replacing these pieces could be a real challenge. All the hardware is grade 8, however. And so, it is quite tough. The bolts themselves look untouched by the forty-some years they’ve sat. I’m guessing the a coating of paint may just have given them some extra life.
 floor sealed by the end of the week.
 I do wish we were done with metalwork on the “tub” — the car body. We haven’t touched the bonnet, we’ve done very little with the doors and the trunk lid, and the engine and other mechanicals are practically untouched.
 any) given to the body was no longer needed, so we cut it free and removed the vestiges of the left floor. This freed up the otherwise inaccessible space behind the interior rear bulkhead and the part of the bulkhead that faces the independent rear suspension (IRS) — a void of about 3-4 centimeters wide running laterally across the car. I vacuumed the dust and dirt that had accumulated, brushed off what I could, and Rustoleum primed the entire inside of the void. I really wonder why the car was designed to have this inaccessible area, since once the floor panels are on, you can’t rustproof or paint anything in the void.
 and used it to fashion the piece. The stiffeners were made from 20-gauge steel, and I fashioned the middle stiffener from the design I used for the middle stiffener done for the right sill. The secret is to be generous in your measurements for the tabs that you use to weld to the sill. It is easy to cut metal away, but not so easy to add it.

 version of the product, evidently. I do not believe that the Jaguar I have “needs additional strength” but I figured that some additional metal wouldn’t be that bad after all. The trouble with the “silver” product seems to be that it is harder to apply. It dries to a less than smooth surface, so you have a bit more work to do in smoothing everything out. In the case of this restoration, I wasn’t too worried about smoothness, since I have some work yet to do on the body, so reinforcement sounded good.
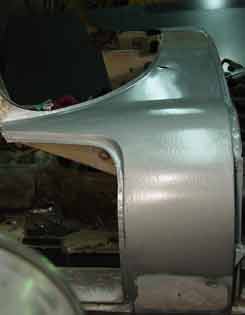
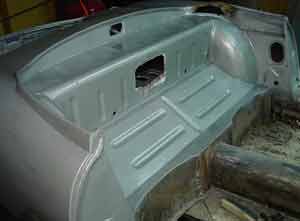 The lower section of the top part of the bulkhead cover — that is, the area where the outer sill meets the body panel — I have left alone. I am concentrating on the upper sections of the body, since it will be easier to do the lower “hemisphere” of the body when I have flipped the body over. I will do the body work in the lower section after the outer sill on this side is installed (and on the other, most probably).
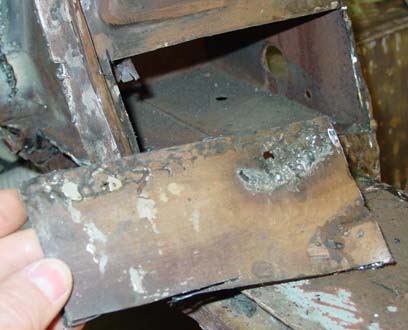 the outside of the “B”-pillar actually had some structural impact. Unfortunately, the way to obscure the fix was to apply bondo, and so the structural repair was apparent in a large lump of bondo about five centimeters from the base of the pillar, just under the door striker.
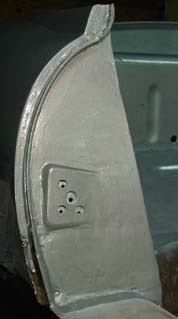 Then we measured the hole carefully, cut it out, and welded it into place. The tabs themselves were spot welded, and then along the perimeter we used a regular old butt weld.