Fixing the Right Inner Sill (19 – 21 October 2002)
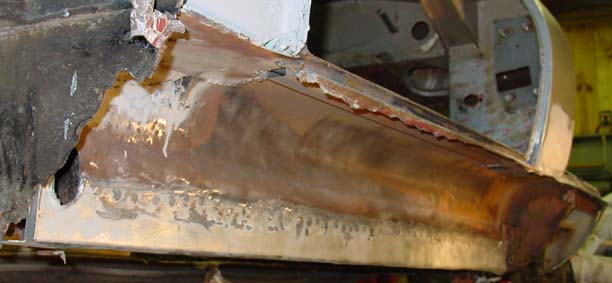
I mentioned evil rust. Well, we found plenty in the inner sill on the right side of the vehicle.
Apparently, the right outer sill had been “repaired” by a previous owner, whom we shall call the HVAC Man (thanks, Mark O’Neill, for coining the name). Some of the cosmetic fixes consisted of attaching 26-gauge galvanized sheet metal (the kind used in heating and air conditioning ducts) with pop rivets and then bondo-ing over the lumps. This was done on the right outer sill, right over a rusted out (probably original) outer sill. That ancient outer sill had been ingloriously spray-painted a candy apple red, so it was probably a relief to cover it up.
Anyway, little, if any, attempt was made to arrest the development of rust inside the sill itself. The inner sill (which is the part of the sill visible from inside of the vehicle) was badly corroded along the bottom and especially so in the rear section. A picture shows it well:
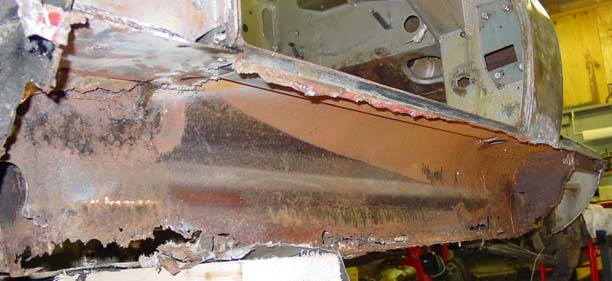
To find where the corrosion stopped and where good metal began, we removed the rust with an angle grinder along the length of the inner sill. We found that sound metal was consistent about 1″ below the bottom of the reinforcement bend located along the sill, about halfway up. We marked a line at one inch below the bottom of the reinforcement bend, and cut the sill. Then we carefully cleaned the surface from the cut to the bottom of the bend. We would use this area to attach the newly fabricated lower part of the inner sill with spot welds (spaced about a centimeter apart) and lap welds both on the inside of the sill (as shown) and on the other side (facing the interior of the car). We fabricated the part from 18-gauge sheet metal — a little thicker than the 20-gauge that was originally used for the Jaguar’s monocoque body.
Here’s what we’ve ended up with thus far. It’s pretty much done, though we’ll do a little more grinding and perhaps some cleanup welding once we flip the car over to install the floors. Then we’ll have easier access to the sill. Also at that time, we’ll attach the front and rear sill “stiffeners.” I’ll probably fashion another stiffener to fit mid way between the front and back. Another stiffener won’t hurt. Of course, the front and rear sill terminating walls will be replaced.