Sand Play (29 September 2002)
We were quite industrious the first week, and we stripped most of the “tub” (the name given to the basic body stripped down to essentials). We used aircraft stripper, old wood chisels, putty knives, and rough scrubbie pads. Because rust reappeared in several areas overnight, I used some WD-40 (you can do practically anything with it!) to seal the metal from the air. That did the trick, though we will have to be sure to degrease the surface before painting.
A bit of paint remover is just fine, but it leaves paint residues in lots of tough-to-get-at places. So we’ll be using a sandblaster to get rid of the paint and coatings in those areas. A sandblaster also preps the metal for the sealant I’ve chosen (see “A Little on Rust Protection” below), and cleans everything right down to bare metal. Sandblasting is really dirty work. As a matter of fact, you haven’t felt grime, ’til you’ve blasted some sand around. Sand gets everywhere: your hair gets encrusted to the roots and your underwear proves to be more permeable than you’d think. A shower never felt so good as after a sandblasting session.
We found sandblasting “media” at the local Home Depot, though it seems to be little more than what you get with “Play Sand” at your lumber yard.  (Play Sand is the stuff suburbanites use to fill their kids’ molded plastic sandboxes.) Play Sand might be a little less fastidiously dried and screened, but it’s pretty similar to regular old blasting sand. Overall the sandblasting was most successful with parts that you could easily handle, such as fittings and small pipes that were taken from the frame. The blasting was less efficient on the body itself, even though the body paint was fairly removable. There was simply so much acreage to blast!
So, for large areas without too radical curves or angles, we fell back to using a disk sander with 60 grit sandpaper. It cut through the residues nicely. For areas that were more curved, I restripped them, using a tough 3M scrubber after the paint was mostly scraped with chisels. With a final application of aircraft stripper and a couple of wipes with the rough scrubbie, the metal was pretty clean. We sanded those areas as well after they had dried. The sandblaster worked very well in less accessible areas.
Sandblasting and finish removal reveals all of the areas of hidden rust and ancient repairs. For the most part, we had already identified areas requiring repair and had figured out what would need to be done. However, paint removal from under the rear tail section showed some unexpected rust below the gas tank and along a couple of the stiffeners inside the “boot” (British English fortrunk). About a quarter of that section of the body skin will have to be cut out and replaced. Fortunately, it won’t require any fancy manufacture: it’s pretty much flat metal.
By Sunday evening, the rear section of the body — roughly from the rear cockpit bulkhead to the taillights — had been primed with rust preventative paint, except for the areas that would be removed and replaced with metal. This primed area will require another coat of preventative primer (after wet sanding) before we will be able to concentrate on the finish. But, then, finishing is still a long way off, so we won’t need to dread wet sanding in the near future!
Evil Rust (1-2 October 2002)
We managed to cut out an area at the base of the “B” post on the right side of the body. This area is where the door striker is located. The E-Type is pretty much built around its doors, and so this area is of critical importance to get the body straight. Thus far, this Jag is pretty straight, despite its age and disabilities with rust. However, the “B” post on this side was showing some deep rot, which was visible through one of the structural holes in the body after we had removed the interior parts covering the body sides and the rear bulkhead. This area is also atop the rear portion of the outer sill that I had already written off. It was not surprising that the section had deteriorated. (The picture shows this section from the outside of the body. We also cut away a portion of the badly rusted rear “stiffener” so that we could see the damage behind it. It is as bad as it looks, too.)
Elements of the “B” post here, the “stiffener” inside the sill structure, and the lower section of the inner sill will need either removal and repair or replacement. 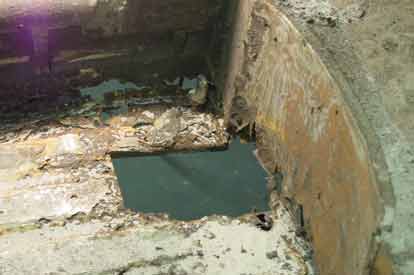 The lower section of the rear bulkhead — the section immediately behind the right side seat — also need replacing. This section apparently was under some significant corrosion pressure, since a stabilizing bar from the rear suspension was the only part the we actually had to cut out because of rust fusing the bolts to the body. The picture below shows this section of the interior, with the rear bulkhead plainly visible and the rear portion of the inner sill showing some significant corrosion. The rectangular hole in the floor panel was cut out to remove the rear suspension.
Fortunately, all of these parts are available (such as the entire “B” post structure) or they are easily fabricated (such as the read bulkhead center section).
We removed the right side door to get better access. A next step will be to shore up the “B” post with reinforcement pieces installed for the duration of the body rebuild. I’m thinking it might be good to repair this section of the body first and then move to the inner sill.
A Little on Rust Protection
Search the web for car restoration web sites, and you’ll get a whole bunch. The pages will often be devoted to rust removal, rust repair, and rust protection. This is the common theme: your car will end up as a pile of iron oxide unless you do something.
Unfortunately, the E-Type is a victim of its own success when it comes to rust. So-called “restorers” scoop up the cars, slap some bondo on them, spruce them up for a good show, and sell them. They’re interested in the sale, not the car, and so the underlying rot lurking in the the most obvious places ends up obscured by fibreglass and a cheap paint job. The car is weakened and soon headed for the scrap pile.
That scenario needn’t always be repeated, and for this car, it won’t be. I don’t intend to sell it, for one. I plan to drive it regularly. And, above all that, it just seems right to repair the rust and boo-boos as well as we can.
Of all of the rust treatments I researched, a product called POR-15 got good reviews. I ordered samples of the product and was impressed enough that I’ve decided to coat the entire car (wherever possible) with the stuff. It isn’t exactly easy to work with, though it does coat nicely even with a brush. You do have to think about things like surface preparation and even the timing of your paint job — topcoats of POR-15 products need to be done when the POR-15 primer product is as a certain point in the curing process. The end product is comparable to “powder coating”: it’s tough, it’s (probably) very durable, it looks good and stays that way. The POR-15 primer itself is available in colors (grey, black, silver) and in clear, but the manufacturer doesn’t recommend using POR-15 primer in places exposed to sunlight. The product discolors if exposed to UV light, so you have to use a top coating.
Uh, it ain’t cheap, either. But when you figure the math out, you see that spending some money on coatings wlll prevent expensive rust repairs in the future. I like doing the restoration, but I’d like a child or grandchild to do the next restoration of this Jaguar!
 showed up to help flip the car back to “normal-side-up.” The day before, I had finished up with POR-15-ing the left floor panel and setting the rear floor stiffener to rights. I was anxious to get the car back to normal (at least in orientation). This wasn’t a tremendously productive weekend, but it did have that milestone.
 welding, and Aaron did the welding, for the most part. As I said in the
  of the panel (along the seam of floor panel and outer sill) had a very natural fit. We basically just laid the panel on the car and welded. However, the central portion of the panel (behind the cross member where the right and left floor panels meet) seemed to bulge a bit. We will bolt that area in any case, and probably weld it as well. As I recall, the original floor panels had a separate panel attached in this area, which is the part that forms the “floor” of the drive shaft tunnel. I don’t know that this original panel was an original part, in any case. (I haven’t look at the notes or at the parts themselves, but this piece may actually have been something other than metal.) The pictures I have seen of this area don’t show a metal cover over the area. And yet, a sheet covering the area where the floor panels meet actually doesn’t sound like a bad idea.
 interior meets the lower edge of the convertible top. This area has been badly corroded, and crudely “fixed” with Bondo and wood strips (!). We had removed this blodged repair, and intended on doing some metal work. That we did, with two pieces of 20-gauge metal. The first piece was aligned with the curve of the upper portion of the left rear quarter panel, and the second piece (welded on top of the first piece from inside the wheel well) formed the fillet wall. As with other fixes, we ground off the welding excesses, and used Bondo to smooth the surface. We were actually less worried about how this fix looked, since it is in a place where you really need to want to look to see it at all. After the application of Rock Guard to the area, this fix won’t be easily visible. But trained eyes will see it, I guess. If they look for it….
 I do wish we were done with metalwork on the “tub” — the car body. We haven’t touched the bonnet, we’ve done very little with the doors and the trunk lid, and the engine and other mechanicals are practically untouched.
 any) given to the body was no longer needed, so we cut it free and removed the vestiges of the left floor. This freed up the otherwise inaccessible space behind the interior rear bulkhead and the part of the bulkhead that faces the independent rear suspension (IRS) — a void of about 3-4 centimeters wide running laterally across the car. I vacuumed the dust and dirt that had accumulated, brushed off what I could, and Rustoleum primed the entire inside of the void. I really wonder why the car was designed to have this inaccessible area, since once the floor panels are on, you can’t rustproof or paint anything in the void.
 and used it to fashion the piece. The stiffeners were made from 20-gauge steel, and I fashioned the middle stiffener from the design I used for the middle stiffener done for the right sill. The secret is to be generous in your measurements for the tabs that you use to weld to the sill. It is easy to cut metal away, but not so easy to add it.
 body panel, but the bottom portion did not. At the bottom edge, the metal was sticking out about 2 centimeters — a significant bulge to finesse with Bondo. I actually thought about just leaving well enough alone and using Bondo to cover the lower portion, and yet that seemed a bit sloppy. I ended up cutting off the portion of the metal that wasn’t tight and fashioning a plate to refit into the hole. I ground off the messy weld-metal, and refit the portion. It fit nicely. I then welded the two pieces together along the seam, and then ground o
 ff the excess weld. Bondo flattened it up well enough. Since the hole was inset the thickness of the sheet metal inside the trunk area, I sanded and cleaned up the area around the hole and bondoed the indent so that it is flat. Of course, the fix lacks two of the creases that are normally found on this body panel, but this fix was good enough. It is strong, and since it is covered by upholstery, it will also be invisible.
 windshield. These could not bear the weight of the body, and we made sure that theynever touched the floor as we lifted and turned the body over. This was mainly a matter of placing the rear (the so-called “boot”) of the body on a pad on the floor, then removing the support from the front. Once the entire body rested on the floor we literally rolled the body onto its side. Then after having placed the support for the front where it could accept the body and support it, we lifted the front part of the body up, leaning a portion of the body weight onto the rear section. We settled the front onto the frame support, lifted the rear section and put the supports for the rear into place.
 I was wrong, it turned out, since the bottom of the tranny tunnel hadn’t been well enough protected from moisture. The tunnel has a bit of an indentation on the driver’s side, where the emergency brake lever is situated. This piece contains the hinge for the lever, an electrical switch sensor that lights up the emergency brake light, and the cable housing leading to the rear brakes that are engaged by the emergency brake. (Incidently, the E-Type has a separate set of brake pads that are engaged by the emergency brake.) The bottom of the housing for the brake mechanicals and switch was completely absent — eaten away by moisture seeping and spraying from the road, presumably.
 transmission bell housing. It’s not particularly clear what exactly required such invasive and destructive work to be done. I was thinking that perhaps there was simple laziness at the root of it. For typical adjustments, the E-type has adequate portholes going into the transmission area. But perhaps this was starter work? A clutch job (unlikely, I think)? We shall probably never know.
 Anyway, I fashioned a replacement piece for the front engine/transmission housing wall out of 18-gauge steel, and I cut out the damaged piece from the transmission cowel. That piece we replaced with another piece of 18-gauge steel. Aaron did the welding and the grinding.
 the existing cups and one of them was corroded beyond repair. I ordered a replacement for it. The other one still lingers in my mind as a repairable piece or as a replacement piece. We did go ahead and repair the cup that still has structural integrity, though questions remain because of the threading in the center of the coupling. They are not exactly well defined. I could, perhaps, go ahead and retap the threads with some success. At this point, we are going to wait until the new part arrives (sometimes after the Thanksgiving Holiday, I was told) and then we’ll make a decision about the replacement. I definitely do not want to install a restored part that will fail after a few thousand miles!
 the paint from the inside of the trunk. The fix entailed cutting out the corrosion and the entire fuel filter cup hole, even though the rust damage was isolated to one side of the hole. I figured it would be easier to create an entire hole than it would be to try to fashion a piece and attach it flawlessly to the “good” metal of the original hole. Once again, this was a matter of exactly fashioning a replacement piece, welding tabs to the hole, and welding the new piece onto the tabs.
 more than brackets that fit below the door frames — below the “B”-pillar in the rear and below the structure that holds the door hinges. They turn the (roughly) square sill into two triangles, and that’s why they are so good at stiffening the sills. I was thinking about putting a third sill stiffener in between the front and rear stiffeners, but after I got them in, it seemed as though there really wasn’t that much room between the stiffeners. At least not much to worry about. (I have seen a third stiffener installed by some restorers. They use a modified front stiffener.)
 After I installed the floors I was hoping to be able to install the “radius arm mount cups” — little fittings that hold the arms that come front from the independent rear suspension. But, the mounting cups need to be put into place before the floor goes on. Some of the holes intended for hardware are not accessible after the floor is fitted, since they are then entombed in the rear bulkhead. So I have to get at least one new mounting cup, possibly two. The mounting cup that we removed from the right side was damaged by the cutting tool, and it was at any rate pretty badly damaged by rust.