Category Archives: Body work

October/November 2003 – Primer, block-sanding, coat two

Update: November 12 — It hardly seems worth an additional web page, so I didn’t add yet more pictures of the same old blocking. The focus was on the left door, and I was committed to conquering its waves. The blocking took all of the working weekend, amounting, I would imagine to a good ten-to-twelve hours. I noticed on Bill McKenna’s website that he spent 25 hours on his left door, so I figure that my work is about in line with his. There’s still another coat of primer to go on it, and I don’t know how many hours I spent working on it before this past weekend. As Bill says somewhere on his web site, it’s a wonder that people can actually make money doing a decent restoration. The hours required — and from skilled people, too — are formidable.

Speaking of Bill, I bought a replacement left frame from him. It was good to see his paint job in real life, at least a small portion of it. I’ve not done anything with the frame yet. I figure that can wait until I have the car body primed.

Second Coat of Primer

The car was turned into a pumpkin for Halloween. After the second coat of Tie-Coat Primer was good and dry, I put on another guide coat of flat spray paint. This time I found a half-can of hideous orange. It made the car look like a well ripened pumpkin — appropriate for the season. I took this picture after I happened to see where we were about a year ago. It turns out that we had just applied some POR-15 over the same area of the car after having removed paint. We were still pretty much in a tear-down and clean-up mode back in October-November 2002. It is good to see those old web pages, since it at least gives the impression of progress. Block-sanding tends to throttle that feeling, except of course when you tear into a bright orange marker coat!

It’s probably worth remembering that the point of doing multiple coats of high-build primer isn’t so much to coat the surface evenly with a thick coat. It’s really intended to allow you to even out low areas and obscure high areas, though of these two, I think that high areas are problematic. So in effect, you end up sanding most of the high-build primer off of the car. You leave a reasonable amount of primer on to assure a good bond of the topcoat to the surface. The temptation is to block the car a bit too little, leaving more than is needed to prepare the surface.

I get the feeling that this is really an art. And I also realize that good body work is worth the money people spend for it. It is labor-intensive and experience does count. (Too bad I have so very little experience!)

The second coat pretty clearly tells me that you really can’t spray the final primer coat and expect things to turn out all right. Despite my care while brushing the second primer coat, blocking it was complicated by the fact of the brush strokes. I found myself reblocking sections that had slight ripples from brush strokes, and I believe those areas would have been flat and ready for paint without the brushing. As a matter of fact, I think first coats are fine to brush, but probably not second coats.

For this priming of the car body, I will complete a second coat and second round of blocking the parts of the body that appear “from the curb” — the external sections of the body shell and the bonnet. The internal sections of these parts will get a single brushed primer coat and blocking. This includes the trunk (or boot), the firewall (or front bulkhead), the interior of the car, and the inside of the bonnet. I will probably spray color in the trunk, the interior, and the inside of the bonnet at that point. After all of this is done, I will spray a final coat of Tie-Coat Primer as smoothly as possible over sections of the car that are not already sprayed with color, followed by final blocking of those surfaces.

Of course, I could spray color on everything at once, though I am thinking that I’ll still have to spray color on the bonnet in at least two sessions, since I want to coat the inside of the bonnet thoroughly. This really means that the inside shell without the internal panels will need a separate spray session. The inside panels and the front valance (the lower “mouth” section) can also be painted separately. Once everything is together, another coat of color is in order.

Once again, the bonnet seems the complication.

I avoided doing the doors until I feel confident that I have a few more blocking tricks in my repertoire. I applied a bit more primer to a couple of low areas on the rear wings, and blocked them nicely into shape. Perhaps that tactic might help should I run into some irregularlities on the doors. I think that the doors are challenging because they don’t have the curves of the wings and the rest of the body. They are almost a pure tubular shape, and it seems difficult to get them just right. I also primed the trunk lid.

A couple of closing shots show where the blocking stands at the end of the weekend.

October 2003 – Paint-primer-with-a-brush hypothesis tested

Paint-primer-with-a-brush hypothesis tested

I mentioned at the close of the last entry that I was going to test out whether “high-build” primer could be painted on with a brush and still have it serve its purpose. Well, I didn’t use a typical sprayed “high-build” primer, though I used a “sandable/buildable primer.” The coating is “Tie-Coat Primer” that I needed to use to bond coatings to POR-15. POR-15 is very tough, and it has properties that make it tough to get regular primers to bond to it. Basically, you have to sand the surface rough in order to get primers or paints to stick to it. Or, you use Tie-Coat Primer.

I applied the Tie-Coat to the bonnet nose, which needed some smoothing in any case. I put on two coats, and after they had set I sprayed a thin coat of regular old flat black paint. The black paint was the “guide” coat that would mark where I had sanded and would highlight low areas on the surface. if the test worked the sanding after this initial primer would leave a perfectly smooth surface, leaving slightly rough and darker patches where low areas would be. High areas would become the color of the underlying POR-15, since the primer would be entirely removed with sanding. Only block sanding is allowed at this point. Taking some wet sandpaper in hand and trying it out with your fingertips just leaves grooves and usually frustrates the purpose of the marker paint coat, since your fingertips just follow the surface, however rough, and take off the paint.

The picture of the bonnet nose shows the light black marker paint over the buildable primer and the block-sanded surface. The bonnet, you might recall, has been a real challenge, and the marks show it. These marks are mostly well defined notches where body filler wasn’t adequately applied. Most low areas end up looking like shadows where wider, less detectable, depressions lurk.

I’m happy to report that the paint-primer-with-a-brush hypothesis tested out just fine. However, I do think there is a bit more waste of primer, and perhaps coats need to be applied a bit more thickly. This is because you have to sand through the brush marks, which appear quite clearly after the first swipes of the block over the surface. There also may be a bit of a tendency to remove too much primer in certain areas in order to remove brush marks. My suggestion is to remember to use reasonably long swipes of the block and avoid concentrating effort in any area. If you are using anything shorter than a 20-30 centimeter (about a foot) stroke with the block, you are probably going too hard at an area. If you use a small block to get at tighter areas or corners, be extra careful.

Because of the brush marks, I’m a little suspicious about applying final primer coats with a brush. It might be counter-productive, though I am going to see whether it’s possible by watching this project. I do think that brushing at least an initial coat makes good sense, and it probably can allow people to avoid a mess with sprayers.

A footnote: I was originally thinking that I would use Tie-Coat to prepare the surface to accept another high-build primer, but I learned from the POR-15 people that they don’t recommend mixing primers like that. They told me in response to an email question that Tie-Coat is a buildable primer and using another primer over it might have unexpected results. They responded quickly, too, I’m happy to report. I don’t know about the response, though, since it might have been designed to drum up more sales of Tie-Coat Primer. I’m not taking any chances, however. I’ll be using Tie-Coat as the one-and-only primer for this project.

Initial brush priming the body shell

After the bonnet experiment tested well, I went ahead and brush primed the body shell first with a thin coat of Tie-Coat Primer and then after it had set overnight a thicker coat — at least a coat that ended up with some drips here and there. After that coat set, I sprayed a dusting of the flat black paint as a marker coating. I made sure that the primer itself had set before I did any block-sanding. (Tie-Coat is supposed to accept topcoats after no less than 24 hours after application.) Since temperatures had been below 60 degrees Fahrenheit (about 15 Celsius), I gave the primer about 48 hours before I tried blocking.

I used 320 grit wet sanding on two different block sizes, a four-incher and a nine-incher. The smaller of the two worked very well on the rear upper quarter panels (the “humps” to each side of the trunk space over the rear wheels). The larger block worked merely acceptably on the larger flat areas on the sides and forward on the body shell. I say acceptably, since the right door gave me a fair amount of trouble. I had built up the rear lower section of the door so that it met the door frame, and I expected that there would be irregularlities that would come through in the marker paint. Oddly enough, the door blocked to a light blue, practically without a bit of marking paint appearing, even though irregularlities were quite easy to feel, and pretty easy to see when the piece was cleaned and shiny with water.

I should add that the “Carolina Blue” color of the primer was not my choice. That’s apparently the only color Tie-Coat comes in, or I would have chosen something else! This is the only time this car will appear light blue, at least as long as I own it.

But, back to the block issue. I didn’t want to use the longer home-made block, since it lacks the soft covering behind the sandpaper, and I didn’t want to gouge the surface with a slip. I do think that either I need to get better with the nine-inch block, or I need to find a much longer block to do the sides. I’ve noticed that the body folks at Classic Jaguar have a huge block with two handles on it to do the side panel and door work. The flat surface of that block must be about a meter long, since it easily straddles the length of the door and overlaps well over the ends of the door frame. A good long block would come in handy when you block up the body shell, the outer sills and the bonnet, I suppose.

Block sanding is not very interesting, though it does have some rules. First, keep the block parallel to the line of contact. In other words, if you are block-sanding a curved surface, the contact points of the surface should be a consistent line from the front to the back of the block. Second, move the block diagonally across the surface, first in one diagonal and then after you cover the surface, along the opposite diagonal. In effect, you make an “X” shape with the directions of your sanding over the surface. Third, thoroughly block the surface, but don’t dwell on any one place too long. With “high-build” primers, it’s pretty easy to oversand an area. And, fourth, use the block, not your hands. You can’t believe how many times you’ll be tempted to “touch” up an area with your fingertips. You can’t believe how many times you’ll screw it up. If you can’t resist the urge, use very, very, very light pressure with your fingertips, and don’t dwell on a specific area. I’ve found that even trying to rub down drips of the brushed primer with fingertips is counterproductive. The block is much better. You’ll need to keep the block quite wet, too. The primer soon turns into a gooey lubricant if you don’t rinse it off. I used warm water with just a few drops of dishwashing soap. The soap seemed to help keep the sandpaper clear, and yet there wasn’t so much in the water that soapy film became a problem. An old cake pan worked great as a container. Wipe the blocked surface with a wet cloth to get the sanded primer out of the way.

I got the entire external section of the upper body shell completely block-sanded in about seven hours, I would guess, after subtracting interruptions and breaks. Like I said, this is not very engaging work. It’s repetitive without a doubt.

I checked the surface by wiping it with some low-concentrate soapy water and then looking at the reflection of flood lights along the surface. The lines should be predictable, and you shouldn’t see small wavers (except where you’d be expecting them). The dark picture shows the floods reflecting against the right side of the car. There are some pit-like reflections that come from small soap bubbles. You can see a wavering of the reflection in the door, where irregularities widen the reflection. I usually get a good long reflection in view and then move up and down to see the reflected line travel across the surface. In the case of this side of the car, I should see a consistent line. I didn’t because of irregularities in the door panel. It still needs work. But the rear quarter panel is in pretty good shape.

I also used a little bit of Evercoat “Easy Sand” body filler to bring up a couple of areas on the left side — one flatness over the rear wheel well that I mentioned before and flatness where I repaired the “fillet” some time ago. Very little of the body filler was required. That Evercoat product, by the way, was good to use and seemed to set well. I now wish I had used the Evercoat body fillers from the beginning.

Second coat of primer

I decided to try brushing the second coat of primer. (I’m planning on three coats for external sections of the car.) Instead of applying a coat that would drip, I applied two fairly thin coats, and I’ve applied a third thin coat to areas I think need a little more coverage. I’ll let the primer dry well and apply a marker coat of paint sometime this week. Then it’s back to blocking again. I’m debating what to do about the nine-inch block. Do I try to use it again? Do I look for a longer block? Do I try to make a long block myself?

October 2003 – Color choice, subframe & “boot” primer

Color? It’s going to be British Racing Green

Ah! to fix dents is easy. You see them, you fix them. You know when it’s right. Not so with color. I know that I have driven my family crazy with this decision, and I can’t but help think that even this decision is, well, provisional — at least until the paint sits in a can in the garage.

I know I have felt as committed to

  • Opalescent Silver Blue — too much like Carolina Blue, and I’m a Duke man,
  • Opalescent Dark Blue — Duke blue on a car, but my wife’s truck is the color already and red or dark blue interiors are recommended, and
  • Opalescent Dark Green — great in theory, but the car recently sprayed the color in the Classic Jaguar workshop just didn’t appeal to me.

And British Racing Green is a color with roots. The earliest surviving E-type roadster, if I’m not mistaken, is BRG. It was (and still is) known as 77 RW, restored in 2001. British Racing Green is a good traditional color for British sports cars. So why not have one in rural North Carolina, too?

Centering the bonnet subframe

When we stuck the bonnet on the frames, just to see what the old thing looked like, we noticed that the bonnet was cockeyed. The trouble is in the bonnet frame, which probably sustained some accident damage. (My initial observations, including a description of the way the damage was “repaired” or at least hidden, appear in a previous entry.) What we needed to do was more systematically and geometrically characterize the damage: What was pitched? How much was it off center? Where is the pivot for the pitch to the left side of the car?

The exploration really began with some crude drawings that I made back in August, when we could measure the effect that the frame damage was having on the fit of the bonnet. Those measurements showed that the bonnet was set too far back on the left side — in fact the bonnet was butted against the firewall (front bulkhead) on that side. On the right side of the car, the bonnet was too far forward by about 3 centimeters or so. Drawing out the general structure of the frame identified a couple of places where the pitch to the left could have pivoted. The entire frame structure could be pitched, meaning that the side frames (the “A” shaped structures that make up the engine compartment) could be bent. This would mean that the pivot would be at the center of the firewall. Or, the front frame piece that holds the bonnet and the radiator could be pitched. This would mean that the pivot would be at the center of the so-called “picture frame,” the front of the engine compartment that attaches to the side frames. Clearly, the pivot from the center of the picture frame would be preferable, since a pivot off of the firewall would be virtually irreparable.

I doubted that the damage was off the firewall, since there was no other evidence of damage there. But the side frames themselves could bear the damage in some not-too-apparent way, I thought. The left side frame already concerns me because of the rust damage I discovered on it.

Another thing that helped was a schematic of the body shell and the front frame structure that appears in the Terry’s Jaguar catalogue (“Body Dimensions,” Terry’s Jaguar Parts, 11th ed. [Benton, Illinois, 2001], p. 6-3). The drawing and measurements help to situate the frame structure especially in relation to easily figured out points on the body. The information is for “checking points for accidental damage on [the] XKE body and front frame.” The only thing that might be a bit misleading is the accuracy of the measurements. They are, I believe, too precise, sometimes going to the 32nd of an inch. That kind of accuracy usually isn’t necessary for the body, since fitting sections together often includes bolts and holes that are designed and intended to be used to make minor adjustments to the fit. But this catalogue is a good reference to have on the shelf. Terry’s Jaguar Parts has a good reputation as a parts supplier. They’ll send you a catalogue if you ask.

Using TJP’s “Body Dimensions” as a guide, we strung some string along the center line of the body shell, extending it out into the front frame area. We found that the picture frame hit dead center as it should, but the bonnet frame was off about 2 centimeters to the left. We marked the point where the center line of the car crossed the bonnet frame hinge tube (the forwardmost pipe) and the radiator mount. We measured these points against the centers of the hinge tube and the mount. Then we tied the string to the center of the picture frame and ran the string to the true center of the bonnet frame hinge tube and checked to see where the string crossed the radiator mount. It crossed at the center point of the mount.

That process of string measuring might seem a bit complicated, but it established that the problem with the fitting of the bonnet was entirely in front of the picture frame. The pivot of the bending was at the center of the picture frame. The picture of the frame from the top plainly shows the bend, and now that I see the frame in a photograph I see how rough it looks. So, now I’m wondering about having even this frame repaired. But that brings up another topic….

On not repairing the subframes

A kind email message from fellow E-type restorer Bill McKenna urged me not to have the damaged left frame repaired. The steel (Reynolds 351) was brazed from the factory and is a fairly touchy metal to work with if you don’t want to lose the temper or otherwise weaken the metal. As Bill put it: “To me those frames are all that’s between a nice drive in the country and a major disaster, so not a good thing to skimp on.” Now, I don’t think that the bonnet frame has quite the stress that the other frame parts have to bear. Nor does the bonnet frame quite have as much riding on it in terms of safety. So, I think I could have the bonnet frame repaired.

About the same time that Bill sent his note, a thread on jag-lovers.org brought up the welding issue, and hammered the point home about “repairing” frames. It just doesn’t seem wise, and even if you would have the repairs done following all of the steel manufacturer’s guidelines, you’d probably end up spending about what a new frame would cost. And, having “repaired” it properly, you’d still have a 40-year-old frame at the end.

I think that my left frame will need to be replaced, not repaired. I’m going to have to look around.

Tie-Coat primer in the “boot”

“Tie-Coat Primer” is designed to bond well even to cured POR-15 coatings, and so I’m using Tie-Coat as a base for the topcoat in internal sections of the body and as a base for high-build primer on external sections. I’m trying something out. I read on jag-lovers.org that someone brush paints high-build primer, since the stuff is supposed to be sanded smooth in any case, so why mess with the mess of shooting the paint out a sprayer? When I first read that, I dismissed it, but after a while it did make some sense to me. And so I’m testing it, not with a high-build primer, but with the Tie-Coat, which is billed as a “sandable primer.” I painted the inside of the trunk (aka: “boot”) with Tie-Coat, and I put two coats on the trunk floor, since I’ll need to smooth it very well, especially in the area around the spare tire. I do not plan to spray this area, or any other inside section of the car, with high-build primer. That’s for the outside.

In addition to the inside of the trunk, I brush painted the upper nose section of the bonnet, which still needs attention. I figured that the paint-primer-with-a-brush hypothesis could be better tested on the nose, too. It certainly could stand some smoothing. I’ll be treating the nose as though it has high-build on it, so I’ll be using a guide coat of some sort of paint to mark where I’ve block-sanded. If brush painting works, I’ll put all of the Tie-Coat on with a brush. I still think that the final primer needs to be applied with a spray gun.

Pictures below show the “boot” before and after the primer went on.

September/October 2003 – Block-sanding the POR-15, more tweaking of the bonnet and doors

Why block-sand the POR-15 coating?

It’s a fair enough question. The POR-15 coating isn’t going to be the coat to accept the final finish. There’s primer to be applied over the POR-15. So, why block sand at this point, when spraying “high-build” primer at this point would actually make sanding much easier?

The answer has a couple of facets. First, I applied the POR-15 in part to seal the work we’d done and provide immediate rust protection. This seemed important because we didn’t expect to complete the body shell very quickly, meaning that sections of the body shell would be exposed for some time. We applied the POR-15 with brushes, and I have to admit that we didn’t worry too much about drips. So, the POR-15 coat protects the body, but it doesn’t particularly make a smooth surface to prime. Second, block-sanding at this point gives us the chance to discover areas on the body shell that escaped notice. As you go over a surface with a block, you notice flatnesses and irregularities. And, when you do that noticing in an ordered manner, you see things that you otherwise wouldn’t. For example, I noticed a problem with the right side headlight opening on the bonnet some time ago, but I couldn’t quite figure out what the problem was. The process of block-sanding trained my senses so that I could remedy the oddness with a smidgeon of body filler.

I think block-sanding has its uses as a psychological tool — training consciousness to details that otherwise would slip by. The process is in fact as much tactile as it is visual, and the block itself sensitizes your touch to irregularities. We used a 11-inch block, a four-inch block, and a home-made block of about 14 inches.

A note on this round of block-sanding: I didn’t use any spray paint coating to serve as a contrasting “marker” paint. We’ll do that later, after we apply the real primer and are ready to do the real block-sanding. The POR-15 served as its own marker, since the sanding dulled the finish and dusted it enough to show contrast in the low areas. Basically, we took the top off the POR-15 coating, though I doubt much actually came off. The stuff is incredibly tough. It was good to have the car a single more-or-less uniform color, too. Dappled colors disguise ripples and imperfections.

The nice things about POR-15 is that you can go ahead and apply body filler right over the surface, though I chose to rough up the area before applying any Bondo. The POR-15 company has developed its own body filler that is suppose to have even better binding quality to POR-15. They also claim to have used more resins and less filler in their product. I haven’t tested it, however.

Bonnet adjustment

I said a while ago that getting the bonnet mouth right is very challenging, and I returned to the bonnet front end with a fresh perspective and sanding block in hand. I discovered sections on the right side of the center section of the bonnet that were either not in accord with
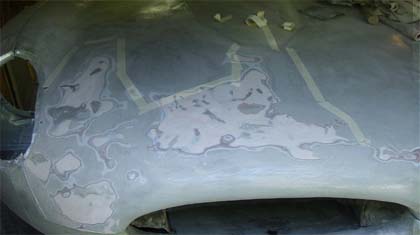
the left side (which was, I should add, fairly preserved from collision damage) or felt higher than was to be expected. That side of the bonnet mouth and the section above the mouth was too round, giving the impression of looking “like a Dodge Ram,” as my wife put it.

Actually, her comment motivated my attentions even more. I have nothing against Dodge Rams, by the way. I drive one daily with great satisfaction, though I’m not thrilled when I have to fill its gas tank.

The picture of the bonnet center section is actually a composite of two photographs, one showing the masking tape marking areas that needed more aggressive sanding and the other showing areas after they had been sanded. The photo with the masking tape outline has been faded a bit, you’ll note. I used an orbital sander with pretty aggressive sandpaper grit (100) to do the sanding. Over the course of the work, I had to pound down some metal that sanding revealed. This was a matter of using a rubber mallet to provide the impact against a ball pein hammer that I held in place. Several light taps usually did the trick. I sanded with the orbital sander until I wanted to check the surface (which was fairly frequently). I checked the flatness and the shape by using the sanding block with a gentler grit sandpaper.

The pounding down of protruding metal had the good effect of straightening and flattening the metal and lessening reliance on body filler. Unfortunately, the pounding also had the effect of breaking and otherwise disturbing filler I had applied inside the bonnet. I’ll have to remove some filler there as well. (This mistake I have since learned has been repeated by a number of people who have taken on bonnet restoration.) If I were to do another bonnet like this (and that is a very big if), I would completely finish the outside of the bonnet before applying even a drop of body filler to the inside. When it’s all done, the inside of the bonnet is of course far less critical than the outside, and having to redo the inside at least wastes time.

Door and wing filler

At this stage, fitting the doors to conform with the body was important to do. Although I’ve been pretty happy with the way the doors fit, both the right and left side doors needed some adjustment. This was especially the case in the lower rear section of the doors. I had already finished the “B” Pillars to my satisfaction, and so I knew where the door skins should meet the body. It was really just a matter of adding about a sixteenth of an inch of Bondo and feathering it in. The left door needed a little body filler in the upper front corner as well. The amount of space that the filler takes up might seem a bit alarming, but it needs to taper very carefully into the door shape, so you actually cover quite a bit with a very, very thin layer. The coverage of the lower rear section in the picture above is actually less than the door eventually ended up with. Think thin with filler.

I did the same touch up on the two bonnet wings. These had some little dents and flatnesses that appeared during the block-sanding.

Isabel wasn’t a big deal, picture of Yours Truly

Hurricane Isabel didn’t make too much of a mark on us. We had about twelve hours of no electricity on a very nice day, so we got through without much inconvenience at all. We had no water, of course, since the well pump uses electricity, but we had filled bathtubs and a few large containers with fresh water before the storm hit. And when the storm did hit, it provided some entertainment and very little terror. Actually, no terror at all — just some wondrously bending trees. We had some clean up after the fact, but this we were able to take care of in a day.

No problem.

There’s never been a picture of The Author on this website, I guess. Here’s one: me, tipping my hat to my wife as I sit atop a 1951 Ford tractor while having a coffee break. We were moving dirt around and grading the driveways, and the tractor was efficient. My father tells me that he managed to wreck a tractor like this one when he was a kid. I happen to think they’re charming little workhorses, and worlds more solidly built than any other vehicle I’ve seen. Of course, there is a bit of a comfort penalty for all of that cast iron and steel.

So, I tip my cap to you, too!

September 2003 – Pistons removed, rear body shell block-sanded

This weekend marks the first year

It’s been a full year this weekend since Derek, Aaron, and I drove out to tidewater Virginia to pick up the old car. At that time I was thinking that I’d be driving the car a year after picking it up. But experience has taught me otherwise. I think we have made good progress nonetheless. It was my expectation that was out-of-line.

We’re watching Hurricane Isabel with some dread this weekend. It could end up being another Fran, some say, or worse. I just hope that the storm turns out to sea. There isn’t much to do about it except stockpile some water and make sure the flashlight works.

Pistons removed

I was thinking about a gradualist approach to remove the pistons, but I am thinking better of it now. We decided to remove the whole lotof them all together, so that we can take a closer look at the crankshaft. I spoke with my dad on the telephone over the weekend about the crankshaft. He tried replenishing bearings on an old engine once before, and they gave way shortly afterward. If the crankshaft is not true — if it has miniscule flatnesses especially — the crankshaft eats up the new bearings in short order. So, I’m going to look around for a machine shop that can check the crankshaft in all of its places and, if need be, turn and otherwise repair it.

As my dad said, now is the time to do it, when the engine is out and already apart. If the bearings fail and the crankshaft is the problem, doing the work later will be even more frustrating.

The piston rings look quite good. The two at the top are supposed to have a taper that narrows at the bottom, and these seem to have that shape still. I would have expected worn rings to be virtually square from wear. The lowest ring is actually composed of three parts: two solid and very thin rings surrounding a chain-like spacer. This assembly is the so-called “oil ring” — probably because it keeps most of oil in the crankcase and not spilling into the firing chamber above the pistons.

I haven’t looked everything up yet, but I’m thinking that the bearings that we took off the piston rods were the 0.010 inch oversize versions. Not only do the markings suggest that, but that kind of wear would fit with the 0.030 inch oversize of the pistons. From what I can tell that size bearing is the maximum as well.

Rear body shell block-sanded

I began block-sanding the body shell. It is a little tedious, but I am amazed at how something as simple as block-sanding can tease out slight imperfections in the body shape. I’ve been marking them with masking tape as I go along. Many are slight dips or flatnesses in inappropriate places, usually at a spot where we had to do a little repair or where panels meet. One area that appeared with the sanding was in a place I wasn’t expecting, just above the left rear wheel well on the rear quarter panel. I suspect that the car was bumped at some time or another and very lightly dented. We probably removed a smattering of Bondo when we stripped the paint and didn’t see (or feel) the flatness.

I was hoping to fire up the air compressor and let Aaron have a go at applying some primer, but I think now that block sanding the remainder of the body shell and making some final repairs would be a better idea. Then we can take on the entire body shell in one day, or at least the top portion. We are going to use some POR-15 “Tie-Coat Primer” which is formulated to bond to cured POR-15. We might not have needed it, actually, since the block-sanding is making the surface rough enough for regular primer to bond to. I already have the Tie-Coat Primer, at any rate.

I’ll post pictures of the marked up car later on. Block-sanding is really important, but it’s easy to overlook because spraying primer is a heck of a lot more fun!

August 2003 – Frame temporarily installed to fit bonnet

I’m so pleased that at last the car has a shape that I’ll test your connection speed with a bigger than usual image. This is a temporary fitting of the bonnet, for reasons that are spelled out below. But here it is — the old car in a car-like shape!

Frame temporarily installed

After getting the bonnet more or less together, I got anxious to fit it onto the shell so that the entire car body would again appear as a whole. Even though I still haven’t glued the bonnet pieces together, I figured this would be a good time. As a matter of fact I was hoping that fitting the bonnet to the frame would help clarify any adjustments that I might need to make to get the bonnet internals ready for the adhesive. I crudely tacked the bonnet internals together with some of the bolts and screws and “oval washers” — but I hadn’t by any means fit them all.

The frame pieces are in decent shape, though I was disappointed to discover corrosion damage on the left frame (see entry for 16 March 2003). The damage was in the usual place, near the battery area. And a corrosion hole had eaten its way through an upper forward tube as well, though I don’t know exactly why this place would be susceptible to rust. I’ve found someone to repair the frame. The picture frame had dents where careless mechanics had used a jack without supplying a wood insert to protect the picture frame. These I pounded out quite handily. The good frames are shown in the brown primer in the picture.

The less stout frame that is designed to support the radiator and the bonnet hinges was suspicious to me even as we stripped and sandblasted it. For some reason it didn’t look quite square to me. I thought at one point that perhaps the irregularity was actually an element of the design — perhaps the bonnet hinges were slightly offset for some reason. The picture shows the irregularity if you look carefully at it. The bar separating the bonnet hinges (there’s only the right side one installed in the picture) favors the left side of the car (the right side of the picture).

Bonnet fitted onto frame

Aaron and I wrestled the bonnet into position and loosely tightened bolts through the bonnet hinges. We noticed that one side was fairly easy to fit and attach, but the other side (the left) needed a bit more coaxing. Even from the gross fitting, it was apparent that the gap between the back of the bonnet and the body shell was simply too big to surmount. This was especially the case on the right side of the car, where the gap is almost two centimeters wide. On the left side, the gap is almost a normal size, though the bonnet appears to be pitched a little toward the left. Also, the gap was large to begin with, so the only adjustment we could make was to draw the bonnet forward by tightening the hinge bolts. But, of course, they only tighten so far. I believe the usual adjustment is expanding the fit of the hinges to the bonnet — in effect loosening the hinge bolts. This is done with shims. The use of shims helps to widen the gap where bonnet and body meet, and heaven knows we don’t need it any wider there!

I think what we’re seeing in the badly fit bonnet and the irregular bonnet frame is the leftovers of accident damage. The question I had was why these bonnet issues weren’t apparent when we first saw the car. Even the smashed up nose couldn’t have hidden a Grand Canyon Gap at the back of the bonnet. This is where some odd holes I noticed come in, along with the benefit of taking lots of photographs of the car at disassembly.

I had noticed two pairs of holes roughly coinciding with the standard hinge holes. The photograph shows both sets of holes, with the “real” hinge attachment holes circled. I thought that perhaps the extra holes, which are slightly larger than the regular holes, might have been actually earlier holes cut into the lower section for some other hinge fitting or perhaps for wiring or whatever. The “real” holes appear in groups of four, two for a horizontal set of bolts, and two for a vertical set. In this way the hinge itself fits tightly into a corner and restricts upward-downward and forward-backward movement. The larger extra holes only appear on the vertical plane — for bolts that fit horizontally.

I went back to the photo archive and discovered that indeed the larger holes were used to fit the bonnet (see the hinge mount bunched toward the left of the lower valance with no large hole apparent). It fair to assume that the bonnet frame was bent toward the left, perhaps in the accident that damaged the nose initially, and the bonnet was altered by fitting it to new holes instead of the bonnet frame being repaired or replaced.

I think we’ll fix this problem by having the bonnet frame repaired. I don’t think it’ll be too much of a challenge, since the irregularities in it are quite apparent. Then I’ll have to repair those silly extra holes!

If you go under the bonnet and situate yourself where the engine will eventually be, you can see that the bonnet frame tubes nearly touch the internal bonnet wall on the left side. On the right side there’s plenty of room. It is apparent that the bonnet walls were fashioned to wrap around elements of the frame. It’s really a nice piece of design work — and I suppose only the designers and those of us fortunate enough to do this kind of restoration are privileged enough to see those details.

I’ve heard it said that the E-Type is a study of the ellipse. It certainly is that, and marvelously so. But seeing the fluid lines of the bonnet internals wrap around the frame is also a design delight, though one less apparent than the elliptical shapes of wheel wells, bonnet “mouth,” headlamps, or the cockpit.

July 2003 – Left outer sill, bonnet internals

Time has been split this summer between the garden (which is quite abundant this year), a wood floor we’ve been installing, and the old Jaguar. Progress has been slower than I’d hoped, but I guess that’s always the case. This September we’re coming up on the anniversary of picking up the car, and I’m interested to see where we are after a year.

Left outer sill

We completed the installation of the left outer sill — the one that I fabricated. As I mentioned, we had to use about two millimeters thickness of body filler along the top of the sill where it abutts the bottom edge of the door. I realize now that I could have avoided this additional body filler had I not been so intent on pushing the sill under the lip of the door frame (which is actually the upper section of the inner sill. I wanted to make sure that there was adequate metal to weld into, which was actually not a problem. Well, next time I won’t make the same mistake.

Now that I’ve nearly finished the body filler smoothing, I look back and think that those Martin Robey sills are a pretty good deal. Not only do they fit nicely, but you don’t have to mess with Bondo (except for the occassional dent or ding). I haven’t looked at the price I paid for the right outer sill, but I think it would have been worth the time to get a left outer sill from Martin Robey, too.

What’s the old bromide? Penny wise, pound foolish.

Aaron wasn’t too enthusiastic about doing the line of welds where the sill meets the floor panel — really under the car. He had done these welds on the other sill and was dodging hot metal droplets the entire time. I did the low welds, and it was not fun. I guess that rotisserie looks better all the time. But we are actually very near the point when such a thing isn’t useful.

We put the door on just to make sure that the door panel fit the frame perfectly, and the side really looks pretty good. It’s nice to see that the car is just now beginning to go back together into a recognizable shape.

Bonnet internals fitted (almost)

Inside the bonnet are several parts that have the roles of supporting the outer shell and of directing air to the heater fan and to the air intake for the engine. The “default” course of air through the bonnet mouth, as it were, goes to the radiator for cooling the engine — something the early E-types were not known to do very efficently. (Our E-type had a contraption that was intended to assist cooling,though it probably had the actual effect of decreasing the air flow to the radiator.) There are seven major parts of this internal structure, with some smaller, tab-like parts that are glued to the inside of the bonnet’s center section. Very early E-types had these tabs welded to the section, often resulting in visible dent-like spots along the top of the bonnet to each side of the “performance bulge” in the center. Not too long into the production of the E-type, these tabs were glued — use of adhesives for this purpose was quite new in automobile manufacture, as a matter of fact.

There are two walls that sit astride the engine and that have ducts going from the sides of the bonnet mouth to the air intake and the heater fan. These were damaged in the front, and I had to bang the wrinkles out and clip off some extra metal. Because I fashioned larger tabs at the front of the bonnet, I had to cut out a deeper slit where these parts fit against the front of the bonnet. These parts are very putzy to fit.

The walls don’t fit as well as I had expected. They are farther from the center section of the bonnet than I had hoped. Since this fitting has been done with the bonnet upside down (as pictured), I’m going to right the bonnet and then take a look at how the internal walls fit. It could be that the dynamics of the piece will change with the pull of gravity working in the intended way.

June 2003 – Lots of stuff

We have done a great deal of work since the last journal entry. I was too lazy to do the writing and formatting, and so the web site got a little stale. My apologies. The parts database is up-to-date, by the way. I got a little worried seeing all of the various parts beginning to accumulate, so I did the cataloging and data entry to get it all current. I’m hoping that rather than adding to the list of parts we can soon begin simply to update records with notations like “painted and ready for installation” — or even better: “installed”

Right and left outer sills installed

The last entry showed the two sills sitting side-by-side on a makeshift table. We went ahead and installed the right outer sill (the one made by Martin Robey) shortly after that picture was taken. Welder-in-residence Aaron spot welded — and closely spot welded — along the door frame just under a centimeter apart. The most tedious job was the spot welding to join the sill to the floor under the car. I did think that a “rotisserie” to swivel the car body would have been nice. As I write this (29 June), the right side is undergoing the final body work to smooth the welds and even up the line beneath the door. The section that was cut out from the right rear wing was replaced with metal, so the entire right side of the car is practically finished and ready for final sanding before priming. The left outer sill is about two-thirds complete. It stands as shown in the picture, with a smidgeon of Bondo smeared behind the door line. I had some left over from touching up the other side. (The picture was taken after I had moved everything in for the night, so it isn’t the best angle. It’s the best I could do given the space constraints.)

The fabricated sill fit well, though we will need to put about two millimeters of body filler along the upper edge of the sill to bring it out a little. It tucks a bit too far in where it meets the door and the “A” and “B” pillars. Other than that, the sill fits well.

Bonnet Wings and Internals POR-15’ed

The bonnet still demands attention, but not now because it needs whacking. The various pieces are all hammered out and smoothed. Now we’ve been trying to get them coated and ready to reassemble. There are a lot of pieces, especially when you count all of the oval washers that hold the thing together. All of these pieces, including the washers, we’ve been coating with POR-15. Luckily, most of the washers we were able to save, so we won’t have to make too many of them. I’ll be cutting them from 16-gauge steel, and I suspect that will take a fair amount of time. We were able to get most of the bad dents out of the bonnet internals, though there are a few remains of creases that I’ll need to figure out what to do with. Since these are inside the bonnet, I’m less worried about getting everything straight and really tidy, though some of these items will be visible with the bonnet open. (The picture was taken after a second coat of POR-15 over the nose section after I sanded out the insect bodies that had embedded themselves into the paint.)

These bonnet pieces will be loosely attached to the bonnet, using whatever hardware attachments are available. Since the center section has tabs that are glued, we’ll get the exact placement of those tabs from this preliminary fitting. Once the placement is all right, we’ll go ahead and glue the tabs on, and then we’ll be able to attach the bonnet pieces more firmly. I left bare metal at the places where I expect the tabs to attach. The adhesive will probably adhere better to bare metal than to POR-15. Interestingly, when we disassembled the bonnet, none of these tabs remained adhered to the center section. They had all come off and were screwed and bolted to the vents and various internal wing pieces. My guess is that there was a fair amount of rattling in the front when the car was in motion.

And here I thought that 60 hours or so would be all the bonnet would take to rebuild. Hah!

Left Frame, Front Suspension, Steering Rack Dismantled

In order to get to the final stages of the metal work and body shaping, we’ll need to be able to hang the bonnet onto the frames. We had dismantled the right frame and right front suspension some time ago, but the left frame, the left front suspension, the steering rack, tie rod, and picture frame were still in one piece. We took everything apart, with the exception of some of the left suspension that resisted the wrenches too much. We’ve stripped and sandblasted the left and right frames and the picture frame and the bonnet frame assembly that hangs off the front of the picture frame. This is ready to be attached to the body so that we can fit the bonnet to the car body. (No pictures of this, I’m afraid. All overexposed and out-of-focus. They will be available in the photo archive nonetheless, since they still have some informational value. I took lots of pictures of this disassembly, too. I figured they would be useful in reassembly.)

I have heard that you need to put in the front suspension brackets in order for the bonnet to fit correctly — at least this is something that I’ve seen in one report. The frames seem pretty strong for the bonnet, so I will be measuring the spaces where the brackets fit to see if there is a difference with and without the bonnet attached. We will rough-fit the bonnet using the failed left frame. It should suffice. Final fitting can be more meticulous later, when we’ll fit closely with the bonnet shims that are needed.

Good news: I think I found a welder who will be able to take apart and replace the failed tubes on the left frame. This will do the trick. I won’t need an entirely new frame. The fellow said that the left frame was already repaired once near the battery area. He’ll jig, cut, and replace everything exactly to spec. I’d like to have the piece in his shop in July.

June 2003 – Bonnet, outer sill, etc.

Bonnet POR-15

It may have been Thursday night, I forget. Anyway, the forecast for the weekend was rain again, and I wanted to get the bonnet center section and wings sealed with POR-15. So I did that on Thursday night, with the center section in front of the garage and the wings nestled inside the garage. I learned a lesson any schoolboy already knows: if you paint at night under the sky, insects get into the wet paint. And, yes, they did: loads of small gnats drowned in the POR-15 paint. I was able to put two coats of POR-15 on before I ran out. On Friday night I sanded the areas of the bonnet where fly lumps appeared, and now the bonnet is pretty smooth. It is definitely not ready for primer, though. Aaron and I will have to take out the unfortunate lumps and grooves that remain even still. It is almost to the point when a primer and block sanding will take care of everything, but now that the entire construct is a metal-silver it’s much easier to see what might need some more attention. We’ll probably block sand the sealing coat, and perhaps we’ll reapply POR-15 if need be.

I don’t think we’ll need to redo any POR-15, though. It’s getting close.

The next step on the bonnet is fitting the lower section to check that everything matches all right. After that (and after any adjustments that might be needed), we’ll POR-15 that section and the inside of the center section and the wings. We still have a bit of surface prep to do on the inside of the right wing. I’d then like to get the internal structure of the bonnet ready and fitted. These pieces are all in very good shape, though they do need to the stripped entirely, sealed and painted. Fitting will be done with new nuts and bolts, though I have cleaned up the so-called “oval washers” for refitting.

Left outer sill fabricated

I bought a new outer sill for the right side, and I decided to try fabricating the left sill from raw 20-gauge sheet metal. It was actually pretty easy, and I saved myself $150, give or take. The sill is really little more than a rectangular piece of steel, partially curved and bent at the points where it meets the rest of the car body. Since the car is symmetrical, I just used the right sill as a pattern, reversing the bends and curves so that the piece would fit on the opposite side of the car. It took about four hours to get everything into shape. I still haven’t completed the piece, since I want to trial fit it before doing the final shaping along the ends and making the indentations and grooves on the lower part of the piece. I made sure to give myself some extra material, so that I had some leeway with the bends on the upper section of the piece. The sill I used as a pattern was about 12 inches wide, and I cut my piece 13 inches. It ended up that I will have to trim the lower section a little.

Before the sills can be attached, I want to apply POR-15 to the inside of the outer sills. We’ll also have to complete the attachment bracket for the left lower front frame (the one the was rusted out). This will entail fitting the frame, such as it is, and drilling the holes for the bolts. I’ll also have to spot weld the nuts on the inside of the bracket — two of those nuts are actually in the sill, so you don’t have access to them once the outer sill is attached. Actually, I’m in no rush for this to be done.

Right valve cover polished

I think I may have mentioned that I’m trying another POR-15 product. It’s called “Glisten PC” and it’s a tough two-part clear coating for polished metal surfaces. I notice that the aluminum valve covers and other aluminum parts of the car oxidize pretty rapidly. It would be nice to be able to protect that metal from the air so that it could keep its glow.

I had buffed and polished a valve cover and made ready for coating it with Glisten PC. As with POR-15, you need to prepare the metal so that the stuff sticks. I followed the instructions and used a special metal preparation called “AP-120” which evidently reacts quite quickly with polished metals. You leave it on “no longer than two minutes” (according to the instructions), and then wash it off. I put it on for about a minute. Trouble. The AP-120 discolored the polish. I went ahead and applied a small amount of Glisten PC to see if the polish would come back. No luck. I ended up removing the Glisten PC, rebuffing the entire surface, and applying some paste wax. I don’t know if that will help preserve the finish, but at least it doesn’t discolor the aluminum as soon as it goes on.

I think that POR-15 rust preventative paint is really very good stuff, and I recommend it highly. I’m not enthusiastic about Glisten PC, also by the POR-15 folks. It could be that it works very well for metals other than aluminum. I’ll give it a go on chrome and steel. We’ll see how it works on those metals.

You might have caught a glimpse of the polished valve cover in the sill picture above. I’ll close this entry in my restoration journal with a close up.

May/June 2003 – Bonnet, part 6

Bonnet seam finishing

We repeated the cardboard trick that we used on the seams in the front of the bonnet. This time we concentrated on the seams that run from the headlight holes to the rear of the bonnet along the seam of the center section and the right and left wings. This seam is fitted with a chrome “bead” when the bonnet is complete. The process is quite simple: You take thin cardboard (we used a cereal box) and insert it into the seam before you bolt the pieces. You need to cut holes or slots for the bolts, but these needn’t be exact. After you insert the cardboard, you should have about a centimeter or two of cardboard extending along the top of the seam. Then you apply body filler to the areas along both sides of the cardboard, which separates the body filler nicely. You can sand right across the cardboard, though it’s usually good to cut the cardboard close to the set body filler before you fire up your sander.

The point of this is to remove any ripples along the seam without disrupting the way that the two sections meet. Because you are smoothing the sections together, the seam is flawless. After you take the sections apart, you can do minor smoothing to the individual pieces.

We needed to do this smoothing because we had installed a new metal tab to the right wing of the bonnet, and the heat of welding made a few changes in the metal along the top of the wing. We had to do some pounding as well in order to stretch the wing back into the correct shape. The right wing flattened a bit along to seam. The left wing, however, required little work along the top.

I realized today that this “bonnet” section of this restoration journal is perhaps a bit tedious, simply because it looks as though much the same thing is happening over and over again. And that perception is not entirely inaccurate. The repair of the bonnet at this point is pretty much the same thing repeated (almost) endlessly. It’s a big job because it’s in fact a big part of the entire restoration effort. Relative to the rest of the Jaguar E-type body, the bonnet takes up about one third of the volume. The surface area of the bonnet is quite large and mostly flat. Since it is large and flat, doing the final repairs is difficult and time consuming. You can tell when you take on bonnet repairs (especially repairs that were as extensive as ours) that the prices that new bonnets go for are not really extraordinary. They fall in line with what “real” repairs would cost, since a body shop would have to invest a lot of expensive time into repairs like what we have done. A new piece imported from England is probably cheaper.

It’s a question of doing the math. And the nice thing about the amateur restorer is that he or she doesn’t have a payroll to make while fixing the old Jag.

Between hammers and welds and bondo-slinging, I removed the bonnet latches from the inside of the bonnet. The right side latch will need some work. It looks as though it was a casualty of a bump or two. The left side latch was completely intact, and the rubber bumper is still surprisingly good. As a matter of fact the left wing as a whole is in better shape than the right. I also fabricated and spot welded a replacement part for the left wing — the attachment piece for the inside wing (one of the internal bonnet parts) that is welded behind the wheel arch and runs vertically up the wing. I’ll take a picture later to whow where this piece is located.

I’ve been thinking that perhaps I should not update the online journal until the bonnet actually looks significantly different, since the pictures are looking too much alike. The nice thing about this: I think the bonnet will look significantly different in about a week.