IRS rebuild
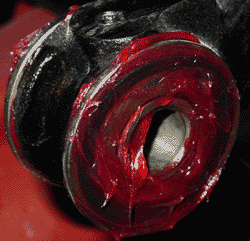
I had read the an IRS rebuild is actually straightforward and not too challenging. I agree. I also have a new measure for how long it takes: in winter it takes as long as a thumbnail to come back in; in summer, probably considerably less. I know the thumbnail timeframe because I managed to pinch my right 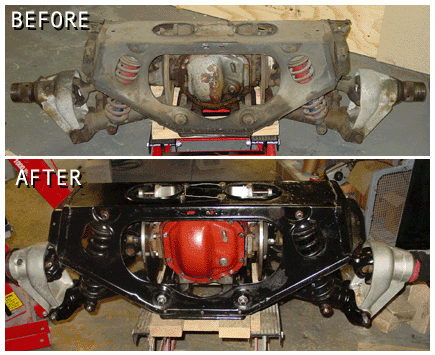 thumb while removing the differential on the first day of working on the IRS. Now, with the IRS back in place, my thumbnail is just about back to normal, having fallen off and regrown since January.
I had expected the refitting of the several washers, bearings, and seals on the wishbone assemblies to have been the hardest of the tasks. (I didn’t take on the differential, except to do a visual inspection.) It turned out that I’d have to rank redoing the “safety” wires to the drilled bolts as the most challenging part of the job. I spent more time figuring out how to cram my fingers into the tightest places. I still wonder how the work was done on the assembly line, though I believe that the least accessible bolts were finally fitted with lock washers in lieu of the safety wire.
With some solid work, I think you could take on an IRS in a full week. My rebuild took a little longer because I was working in winter, and I ordered parts over a period of time. Also, I mistook the number of parts I needed, making me halt progress while waiting for replacements.
Removal of the innards of the IRS is quite easy, if you follow the shop manual. I recruited my boys to help lift the entire assembly on top of a low shop table (and that was shortly before I managed to crush my thumbnail). After the components were apart, the weight no longer mattered, since every piece is manageable — though the differential itself is a heavy chunk of metal.
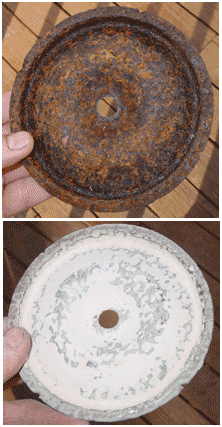
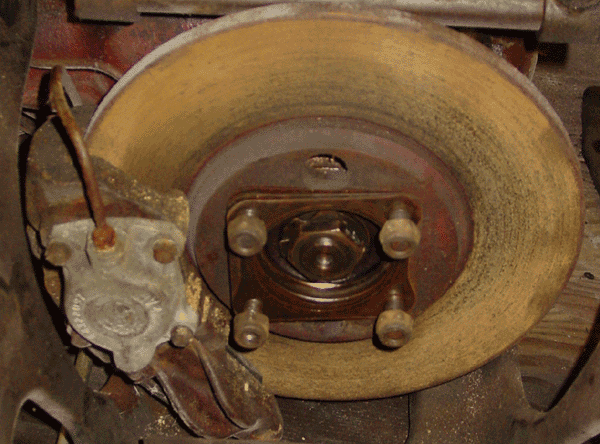
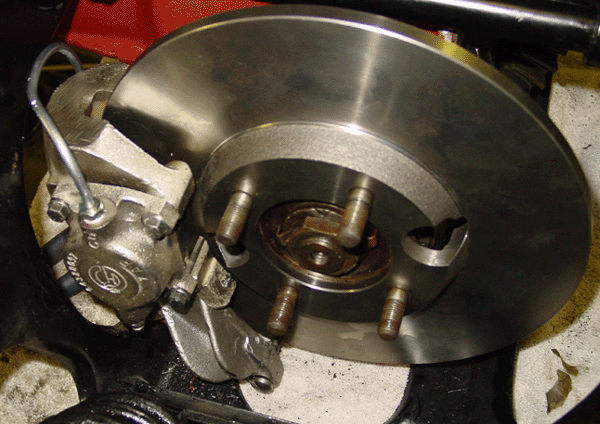
 Rotor alteration. I ordered new brake rotors in March, and those presented me with the first challenge. Holes drilled through the rotors provide access to bolts that affix the brake caliper assembly to the differential case. The replacement rotors had slightly different hole placement than the ones that were fitted to the IRS. (I am very confident that those old rotors had already been replaced once already, so they were not original.) The new rotors had holes too far from the center, making it impossible to slip a socket through to tighten or loosen the bolts behind the rotor.
The fix was to shave about two millimeters off the semicircle toward the center of the rotor. This made the hole slightly larger in one direction. I did this 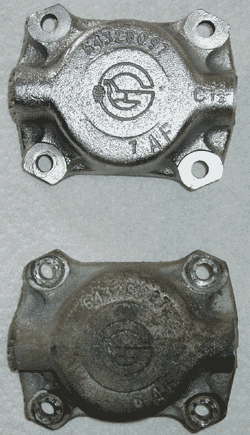 to both holes equally, so that even this slight amount of weight difference on each side of the rotor wouldn’t cause a problem with balance.
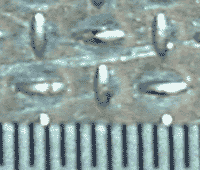
If you check out the illustrations in the shop manual, it looks like the new rotors have more original placement and size of bolt access holes, since the shop manual shows the holes extending across the angled gradation from the bolt-fitting plane to the plane of the rotor-brake pad face. The rotors that were on the IRS had smaller holes placed on the plane for the bolts. See the illustrations below to see the difference.
The old rotors were the same thickness as the new, but they were quite rusty. I am tempted to bring them in to have them turned, just to see how much of the rotor had been consumed. There is a chance that they still could be used, though with the trouble of getting to them it would be silly to put old parts into the IRS.
Brake plating and renewal. Like the front brake assemblies, the rear brake assemblies needed plating. I did the nickel plating on my own, as I did with the front assemblies. I was a bit surprised by the size of the brake pistons, which were much smaller than I was expecting. I noticed that Classic Jaguar often uses the front brake slave cylinders on the rear, and I had mistakenly thought this was for some reason for wear or the like. But it turns out that using the front cylinders for the back amounts to an enhancement. (I looked at Haddock’s Jaguar E-type 6 & 12 Cylinder Restoration Guide later, only to see the difference in cylinder size documented.)
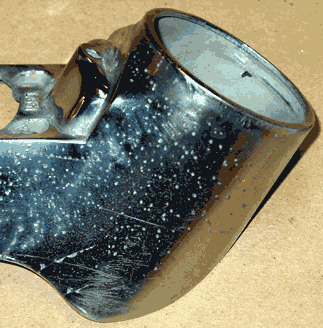
I was also expecting to see Dunlop castings, as appear on the shop manual drawings. Instead, I found what might be Girlings, at least that’s what I’ve assumed since the center of the cylinder casting shows a “G” with a centrally placed hand grasping the letter’s left edge (see the photos). I believe that Girling eventually came to be a supplier for brakes, but I thought this switch took place later in E-type history. From what I can glean from the web, it looks like Lucas and Girling began to co-manufacture in the 1950s or 1960s. I know that today they are considered one and the same, though it’s odd that 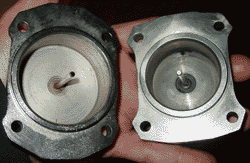 there is no website for the company — at least Google doesn’t seem to report where it is. Perhaps they have consistent electrical problems and can’t keep their web server running. Perhaps Lucas-Girling no longer exists, except as a name.
As a side note, I had prepared for equal sized cylinders in my purchase of cylinder seal kits — so I had two kits well suited for the front brakes. The trouble was that the rear brake cylinders are actually quite a bit smaller than the fronts. I bought a kit for the rear brakes from Terry’s Jaguar Parts for more money than I spent on both of the front kits.
Popping the brake pistons out is a matter of firing up the air compressor and shooting air into the cylinder. Be sure to keep the piston covered, since it will really pop out. The cylinders and the pistons were in good shape, and the rubber seals and boots (manufactured in Australia, by the way) showed no signs of wear or cracking. This was interesting, since the rotors showed wear, but they had very nearly the same thickness as the new ones, something I attributed to the expansion that comes with rust. We replaced the seals and boots with new, of course.
The hand brake setup has a separate set of calipers and pads, and these fit on top of the regular brake caliper assembly. These were a bit of a challenge to bring back into shape. I sandblasted the setup, which was quite rusty, and then I waxed the metal in hopes that it would be protected from corrosion. I later decided that  paint would be more protection, and so I cleaned them all up again and painted. They look good, and I don’t think they will suffer from heat, since they shouldn’t do much other than hold the car in a parking place or at a standstill. Given the function of the handbrake pads, I didn’t expect much, if any, wear. Sure enough, there was none. I really didn’t need to replace them, though new ones went in.
I bent and appropriately flared new brake line. It is easy to do good double flares and bubble flares with the right tools. I really don’t know why people buy prebent brake line. New fittings went on, too, and those I had to cannibalize from other brake lines I bought just for the fittings. There must be an easier (and cheaper) way to get those things!
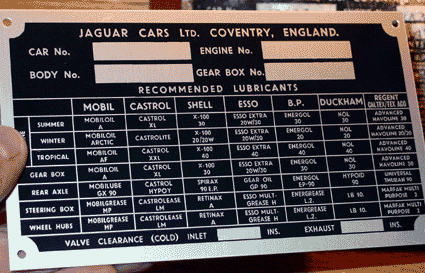
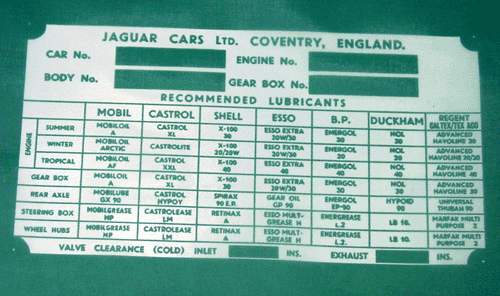
Differential. There’s not much to report on the differential. We opened it up to inspect the gears. We checked for any lateral movement or looseness. Everything looked good and felt smooth and tight. The red-brown paint on the inside of the differential was unmolested, but on the outside it had seen the grit of the years. The consensus on this red paint seems to rest on a brand call “Glyptal” which is a very low porosity enamel that is used to seal inside machinery. It’s used to seal up passages inside of engine blocks, and it’s used by Classic Jaguar in their engine rebuilds, I believe. It is currently available from specialists. (Though I’ve never found it in a auto part store of a paint shop around here, I think I’ve seen it in the Eastwood catalogue for about $40/quart). It’s been speculated that Jaguar dippedthe differential cases in the stuff, though I think that’s probably not the case. Whatever the process, the case and many of its innards are coated with the stuff.
I used a Rustoleum recipe for the exterior of the differential case. It’s a 1:1 mix of Rustoleum “Rusty Metal” primer and Red. The color matches exactly what I was able to find under the grime, and the coating is tough. I didn’t redo any of the interior of the case or its contents. 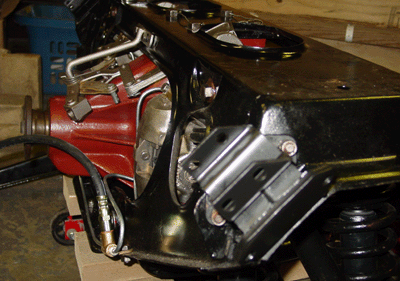 I think Mike Moore, a restorer in the San Francisco Bay Area, gave me the recipe.
One thing we did notice when we drained the differential was how horrible the oil smelled. It was truly awful, and I think the odor might have had something to do with the leather seals in the differential. I suppose this would be a puzzle for an organic chemist to ponder. Also, we ran into what might be some Whitworth threads on certain bolts going into the differential. Certainly they were at least among the few “NC” threads (the course threads) on the vehicle, but they seemed to have a bit of a different angular pitch on the threads. I didn’t tarry long enough to research the matter.
We didn’t replace the differential seals, though the fiber seal for the case access cover was replaced since we destroyed it when we removed the cover.
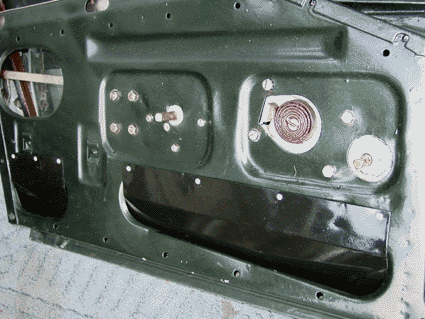
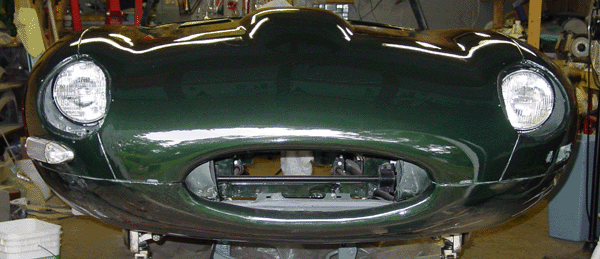
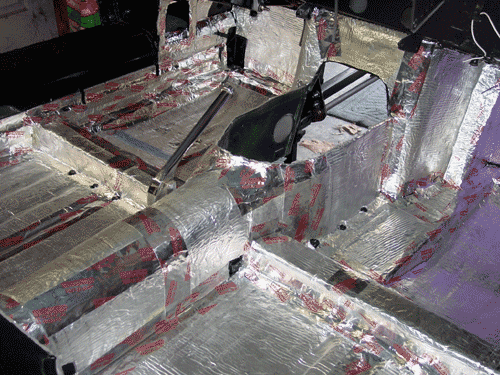
IRS housing (or “cage”). One of the nice design elements of the IRS is that the entire assembly fits inside a housing that is easily removed intact from the body. It’s really just a matter of supporting the IRS underneath with a hydralic jack, removing a few bolts and detaching a brake line hose. Then, with the body supported, you drop the IRS with the jack and roll it out. The disassembly is a matter of removing the pieces from the housing.
After the wishbones, half-shafts, hubs, coils/shocks, and the differential were out, we cleaned up the housing and painted it with epoxy black paint. I know many people go ahead and use a powder coat on the IRS (which was perhaps the original finish?), but I didn’t go that route. The epoxy is very tough stuff, and I think it’ll do quite 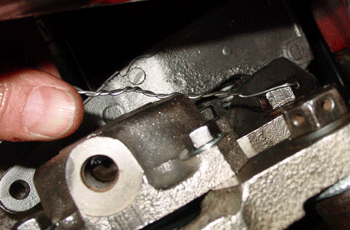 nicely, especially since this car isn’t going to see any moisture or tough wear while I own it.
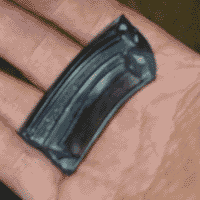
Various notes. Bolt safety wire was a pain to install. I used 19-gauge stainless steel wire, and I didn’t bother to get a wire twisting tool. It seemed to me that the number of bolts I’d have to secure with wire wasn’t enormous, and besides that, many of them were very inaccessible. The safety wire was eventually abandoned and lock washers were used instead on the bolts that are accessible through the holes on the brake rotors. These are very nearly impossible to reach, and I can’t imagine how a production automobile could have used this tactic for securing bolts. (Of course, the run for the E-type was at one time only supposed to have been long enough to qualify the car for Le Mans — 500 copies.)
The wire twisting in the picture was comparatively easy to get to. Twisting it was another matter, as you can see by the less than perfect spiral. This bolt attaches the brake caliper to the differential and its safety wire goes through the other drilled bolt seen in the picture. The bolts that secure the differential to the IRS cage also use safety wire, and because it’s so accessible, it’s easy to do a nice job. That safety wire, I believe, has a certain ornamental value, too!
 If you ever take a look at the “exploded” drawing of the IRS, the number of spaces, seals, washers, and such on the wishbone arms is quite formidable. I found out that the drawing is actually significantly more complicated than the reality, since the parts interlock predictably. I did wonder how to get the parts back into the right configuration and slipped into place before inserting the fulcrum shaft. I used multipurpose grease as a glue, and it worked very well. The IRS case with the differential and the yokes for the fulcrum shaft in place make for an exact fit. The wishbones with the various washers and seals just fit. I line things up and shove them into place. The last bit of adjustment was easy to do with a rubber mallet.
I had a bit of a time getting the last nuts off of all of the shafts — there are fulcrum shaft at each end of the wishbone and the shock absorbers are affixed to the wishbones with a similar shaft. Removing the shafts was easy, since you needed only to loosen one of the nuts, but getting the second nut off was significantly harder. After all, the nut that stayed on was more likely to be fusedon. I ended up soaking the shafts in kerosene, and then I used the air impact wrench to get the last nut off. All the threads were retapped and fitted with new bolts.
My shock absorbers (aka “dampers”) had waited some time in the parts bin — probably over a year — before they found their way into place. I bought Boge shocks, which are supposed to be suitable replacements for stock. The coils were in good shape, all with the correct height unloaded. I brought the old shocks and the coils to a shop to have them parted, checked and painted to coils, and then had the new shock fitted. (The bill amounted to $50, which seemed a little rich to me, since the job total took all of maybe fifteen minutes.)
The other work I had to have done in a (different) shop was pressing the big and little radius arm bushings in. I was able to remove them, but the big bushing especially requires some heavy pressing. After the IRS was in place, I installed the radius arms to the radius arm mounting cups, using plenty of copper paste to prevent the parts from seizing together.
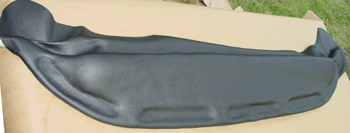
So, two pictures to show the before …
… and after one more time.
 Best Chrome in San Martin, California. I sent them off in December 2004, and I let Ricardo know that I wasn’t in any hurry. The chrome pieces came back in February, after Ricardo attempted repair of the originals without success. He acquired different taillights and chromed them up, abandoning the ones I sent to him as lost to the scrap heap. (May they rest in peace until they are remelted and made into something useful!)
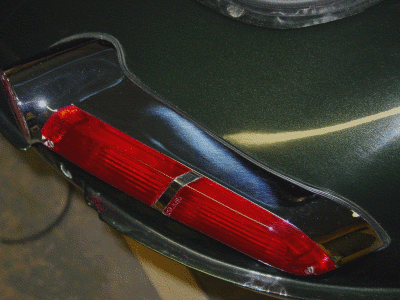 cleaned the accumulated gunk.
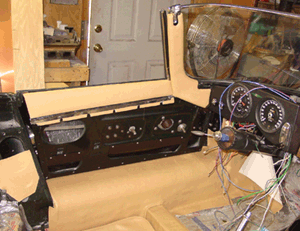
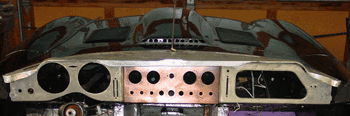 The whole metal frame for the dash interlocks nicely. The steel pieces are covered with black vinyl, and the copper plated center section is covered with aluminum — this model year sported a “crosshatch” pattern that is really difficult to find.
 Getting the foam onto the dash was quite easy. It’s really just a matter of laying out the foam (I used 1/2 inch thickness) and then tracing the vent holes and outlining the entire dash with a generousborder. Then, cut the foam vent holes about 3/8 inch broader than the outline. The rest is a matter of applying contact cement to both the foam and the metal. I found that the “gel” formula contact cement was easiest to use, since it isn’t as easily absorbed into porous material, like vinyl backing or foam. It is prudent to check to see whether the contact cement formula reacts with either foam or the vinyl. Do a test, since you don’t want your materials to melt away before your eyes.
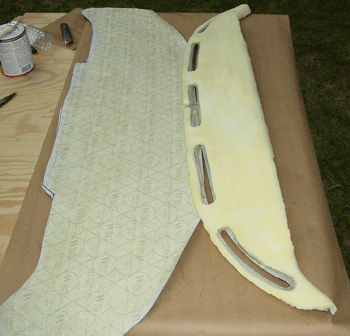 Contact cement goes on the back of the vinyl and on the foam and in the exposed metal around the vents. One caution: Carefully apply the contact cement to the foam, especially. If too much of it is applied, it can seep into the foam slightly, even though the foam cells are supposed to be sealed. If that seepage occurs, the foam can begin to stick to itself internally, causing a depression on the surface (and in your psyche, too). Using a gel formula contact cement helps avoid this, simply because the cement is so thick it doesn’t spread or seep as easily. Light and quick strokes of the brush help.
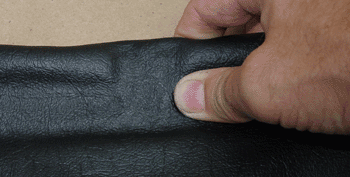
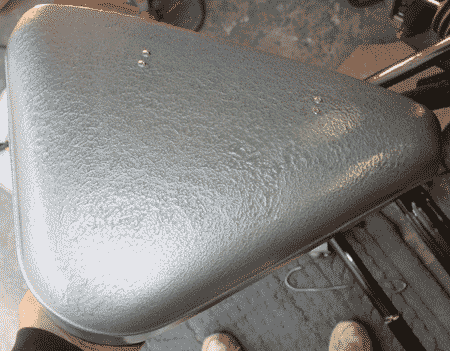
 You can see the final product emerging, but you can also see how generous I was with the vinyl. I trimmed a good four inches (ten centimeters) off the back edge of the vinyl by the time I was done. Appearances are a little deceiving here, though. The picture makes it look as though I had already wrapped the forward edge of the vinyl around the metal. This was not the case, but the vinyl had curled around the forward edge because of the gentle stretching that I did while applying it. At this point, I hadn’t even put contact cement on the underside of the dash.
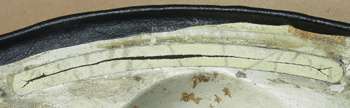 I decided to make edges of the vent openings fold to the underside of the metal. This meant applying contact cement to the underside areas and slitting the center of the vent. Note the “dart” at each end of the vent hole. You can actually cut a little closer to the metal edge. If I were to cut this again, I believe I would have made the dart a little longer, since it’s easier to attach a longer piece to the underside. You can see that I had wrapped the edges of the vinyl already.
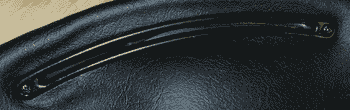 The original setup may have had the duct inserted up through the duct hole before the vinyl was cemented in place. I don’t know. I do know that the setup I took apart was flimsy and it most assuredly was a redo from the original, since the vinyl I took off wasn’t black but tan. The original metal pieces that trim up the vent holes are made of bronze and painted black. They were probably originally attached with sheet metal screws.
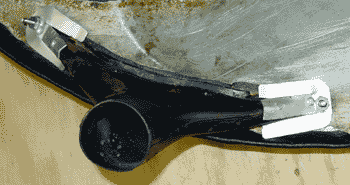 The clips holding the duct in place are attached with a machine screw and nut which replaces the original sheet metal screw. The edges of the duct not covered by the clip need to be glued, so they don’t wander into the hole or otherwise separate from the surface.
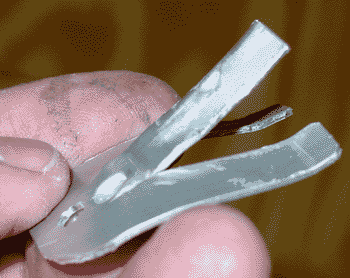 The clip was a simple matter of cutting with snips and a little shaping with pliers. The aluminum is 0.040″ thick. Note that the bends of the feet-like tabs are made to exert some pressure when you tighten the piece in place, though remember that aluminum isn’t great as a spring metal. If you go this route, you’ll need to make ten of these things, but you don’t need to alter the design for the corner vents that are rounded. The clip isn’t long enough for the curve to matter on those.
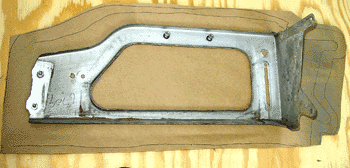 I decided to make a paper template for the dash pieces, since they have an angled surface as well. You can see how much I made the cutting wide, mainly because I wanted to have too much material rather than too little. Since I had a full yard of the vinyl, I had plenty to work with.
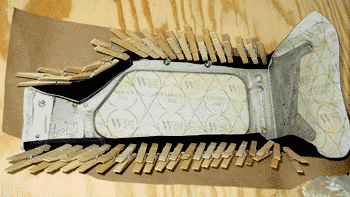 The vinyl having been cut from the template and the surfaces covered with contact cement, it was really just a matter of laying the metal piece onto the vinyl and then methodically affixing the vinyl with finger pressure. I started applying pressure in central areas (though there isn’t much of a central area on the glove box hole!). Then I worked toward the edges. This picture shows a little innovation using clothespins. I clipped the perimeter where I have wrapped the vinyl over the metal edge. It’s probably useful to do this only on surfaces that are hidden from view, because the pressure of the clothespin can flatten the texture of the vinyl. Indeed, the clothespin trick might not really be necessary at all, since contact cement, once pressed into place, sticks pretty well.
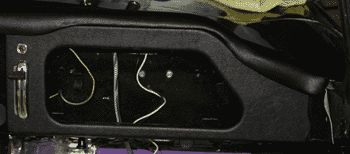 The choke control is in place, and I just laid the glove box piece into position and set the dash on top of it. Though it’s obviously not in final position, the image gives an idea of what the parts will look like when they’re completely installed.