(Done 23 March 2003.)
I did some final touches to the left “fillet” and fit the taillight chromes to the body. (The taillight chromes were often hand picked and adjusted to fit the specific car bodies when E-types ran through the Coventry assembly line.) The body shell is getting close to the point where I can move on to other things more permanently. Aaron and I turned to the left door for the most part of Sunday. I disassembled it and truly appreciated Mark O’Neill’s comment when we picked the car up some six months ago: “Jaguars are very complicated,” he said. “That car door alone is more complicated than an entire MG ‘B’.”
It is apparent that the internal pieces of the doors come out (and, I imagine, go in) in one specific order. Once I got it apart, I inspected the integrity of the door 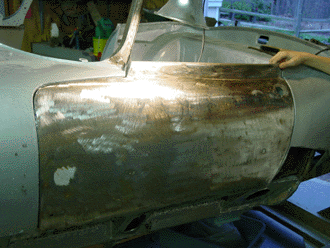 itself. The “skin” of the left door looks quite good. The lower section where the internal box-like door body attaches to the external metal sheet was a little rusted, with a few small corrosion holes poking through. But the metal resisted pressure all right, and we will go ahead and repair the corrosion from the inside of the door. I suspect that the doors corrode in that section because of the weird way that moisture is handled. Water that spills from the body on top of the door falls through a small drain hole, and that drain hole spills into a rubber hose that diverts the water around the internal section of the door hinge attachment inside the door panel. But the strange thing to me was that the hose simply dumps water into the door panel. I would have thought that the hose would have diverted the water all the way through the door to an external hole. As it was originally designed, the water flows into the door panel and then out through two slits on the bottom of the door. The effect is that water can easily collect inside the door panel, and may even be retained by the anti-drum material fitted inside of the door. This material looks like a rubberized felt, but it seems to be still somewhat absorbent. I will probably just replace the hose as I found it, but I have thought that maybe I should alter the door a bit to give the water flowing in a more direct way out. The interior of the door panel will at least be well rust-proofed, so the next generation can renew the door skins if they need to.
Aaron did the sanding and sandblasting of the door panel and the hinge (after we had removed the hinge from the door panel). Then we refitted the hinge to the door and fit the door once more to the body. It was wonderful to see the door frame filled with a door! We took a look at the channels between the body and the door, and decided that the front channel had to be expanded between 1 and 2 mill1meters (something I noticed when we first inspected the car). Since the hinges are already set on the door panel, I decided that we’d alter the space by using spacers (really, just washers) where the hinge attaches to the body. This worked just fine. The rear channel will need a little attention at the point where the lower part of the door meets the body. This channel is too tight, so we’ll have to grind and weld a little. Once that is done, we can remove the ripples on the door skin and get it all ready for paint.
I’m hoping the right door is in as good shape as the left. I’m thinking that the right door will be about the same. We stripped the paint from it long ago, and so we could see the skin. It’s in solid shape, too, I’d bet. I don’t recall the status of the bottom part of the door. That’s still a question, but one soon resolved.