In case you missed it, we had some good pictures of Aaron welding and grinding over the Thanksgiving Holiday. You can review it, if you want. Some of the work reported here was begun over the holiday weekend. It got quite cold on 1 December, and the heater in the Cat Cage was hard pressed to keep things warm enough for working. I quit early and retreated to the house for some warmth.
UPDATE 6 DECEMBER: Ice storm hit us and left us without power and heat for a couple of days. The crystalline trees on the DeLong hacienda were quite beautiful. But unfortunately, there was no escape from the cold. We all slept in the living room and tended the fire all night to chase away the cold. Animals made it through all right, with the exception of a few tropical fish and a beloved catfish. The goldfish in the pond of course didn’t even notice, and Aaron’s hydroponic set up had no casulties either. We lost power around 1 am on 5 December and got it back about 5 pm on 6 December. Thank goodness we had a pile of firewood all cured and ready for use. We’ll have to set the boys on the pile of unsplit wood next week or so.
Arlene’s thinking that a generator isn’t such a bad idea at all.
Left sill
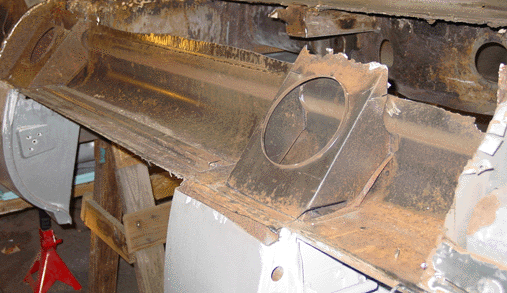
The boys removed the left outer sill on 17 November with the impact hammer, but we didn’t do anything with the hole until Thanksgiving Day  weekend, when we cut the hole clean and ground off the tabs left from the old rusted out outer sill. The corrosion on this sill was mainly in the front, with some rust buildup at the rear of the sill, under the rear stiffener. As with the right sill, there was corrosion nearest the floor as well (in the picture that would the the top edge of the sill, since the car is upside down). I went ahead and took off the rusted section all along the sill, so that we can repair the sill as one piece rather than in smaller sections. It seemed to me that an integrated repair would be more durable. This repair will be very similar to the right sill repair.
You can also see that the front stiffener was corroded at the bottom (the top in the picture). It will be replaced by a home fabricated piece. Although the rust isn’t very visible in the picture, the rear stiffener also was damaged on the bottom. It had weakened steel and a small corroded hole near the bottom. The weld onto the sill, however, was still very tight.
One thing that became very clear was the advantage of having the car upside down. The sill was completely accessible, and gravity worked with us as we ground the cut. Although the angle grinder isn’t really heavy, it does kick around a bit. If I ever do this again (Lord help me!), I’ll remember to flip before the sills come off.
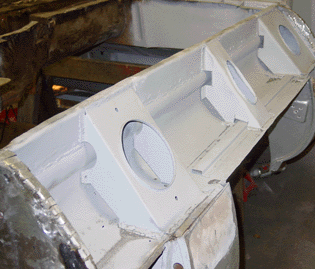
Middle stiffener added to right sill
It is appropriate to see how the right sill looks now that it’s been finished on the inside. The left sill, in all its unrepaired glory, is a little depressing….  You might recall that I wavered a bit about installing a middle stiffener, but I eventually decided it would be a good idea. Although Jaguar’s design didn’t include a stiffener opposite the center cross beam, I thought that lateral movement might be discouraged a bit if we’d install one. Restorers who install middle stiffeners usually use a modified front stiffener. I created a smaller stiffener that is about the width of the cross beam. Aaron welded it in nearly flawlessly — our first weld that did not require so much as a particle of grinding stone. After that, we cleaned it up and primed it with rust-preventive primer. POR-15 comes later.
Repair of trunk floor finished
I don’t have any pictures of this yet. It has gotten cold in North Carolina, and my enthusiasm for taking pictures has waned as the temperature has dropped. I’ll update later. At any rate, the trunk floor is repaired. I repaired the corrosion next to the fuel filter hole, and I repaired some rust damage that happened along the underside of the trunk floor stiffeners. The middle stiffener encases two bolts that serve as the connection point for the exhaust resonators. Those bolts — and the fitting inside the stiffener — were absent when I took off the bracket that holds the resonators to the underside of the car. I fashioned a new connector using stainless steel bolts. It’s now in great shape. I do think that the next time this car undergoes a restoration, the underside of the trunk will need to be replaced entirely. That would be the cleanest fix at this point.
I’ll add pictures later, when the temps go up again.