Body shell spray priming
Over the entire New Year’s holiday and, for that matter, for the entire Christmas holiday break the weather has been absolutely wonderful. We took advantage of exceptionally 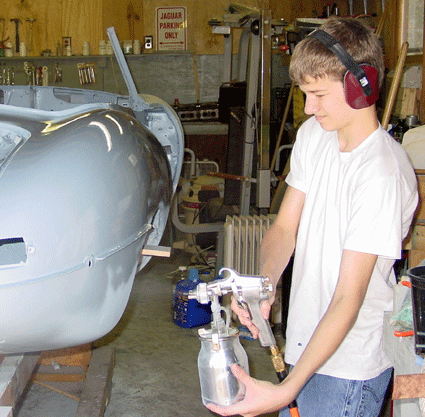 warm temperatures to open up the garage and spray the body shell with primer. The temperatures reached the mid-70s (Fahrenheit, 20+ Celsius), and so short sleeves did it, as you can see from the picture of Aaron spraying the right rear quarter panel. As everything was open and the fan was blowing, we didn’t use face masks, which probably weren’t necessary in this case. But we did wear ear protection because the compressor is so loud. In retrospect, I believe we should have worn our respirators, too.
Aaron isn’t too interested in doing the sanding, but he was ready to do spraying since it involved a new tool to play with and didn’t require tedious motion.
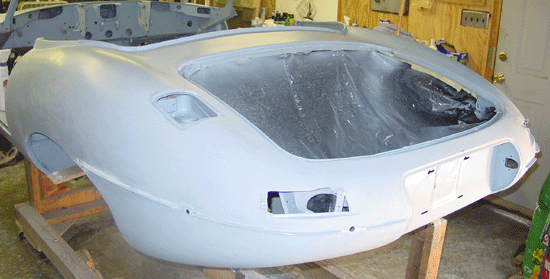
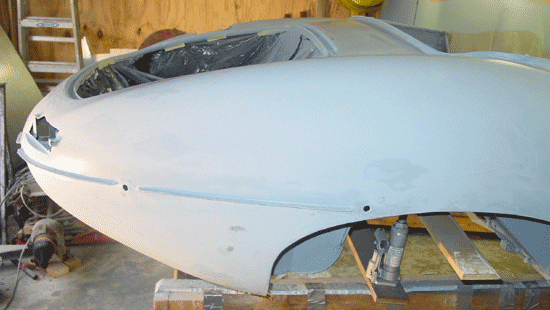
This was the first primer coat that was sprayed on, as opposed to brushed, and it went very quickly. Using a paint brush is a bit easier in preparation, but the real work comes with the block-sanding. It was very nice to see the coating go on without so much as a brush line anywhere, though Aaron was a bit too liberal with paint on the quarter panel since he left a few drip marks. These were easily removed with the blocking, though. You can see from the light lines at the top of the quarter panel that the blocking I’d done before has paid off in nice clear and predictable reflections. The quarter panels actually have been quite easy to do, perhaps because they are not large and flat surfaces. Flat surfaces and ones that require a long straight light line have been the troublesome ones for me.
As a matter of fact, two such surfaces make it impossible for this spray of primer to be the last. The outer sills (or rocker panels) are curved, of course, but the light line extends their whole length and it ought to be arrow straight. The outer sills are really shaped like quarter round moulding — quarter cylinders rounding out the connection of the side panels (and the doors) to the floor pans. Part of the problem (though not all of it) is due to the fact that I fabricated the left outer sill and it has a few irregularities that I need to work out. But I still am having some trouble getting the light lines on both sides arrow straight — it isn’t purely a matter of my fabrication methods (which were, I’ll admit, a bit crude). I think most of the issue is that the area is simply harder to work on because it’s lower and I don’t have a rotisserie to swing the area into easy access. The lower halves of the outer sills had at best a single brush coat of primer, and the sanding was difficult.
They’ll both need at least another spray of primer and blocking. The rest of the body shell is in pretty good shape, and I think that one more spray of primer will do the trick before we can spray color. The interior and the front bulkhead (firewall) will get no more primer. They’re ready for paint, after I sand the bulkhead a bit.
Spraying and blocking the body shell without the doors took two days. I did not spray the underside or the inside of the trunk (boot) nor did I block the front bulkhead or the interior. The bulk of the work was in the blocking the exterior sections of the car, and that was greatly simplified by spraying, as I said. The nice thing about using the brush in the first stages of priming was that it was easy to do small areas (like the detail section on the door that I did). If you manage to do all the prep, spraying the entire car is probably easier, despite the mess of spraying. Blocking sure is easier without brush marks.
Temperatures are expected to drop down to normal levels this next week, so I don’t think I’ll be spraying any more primer for a while. I also got a hold of some rock guard, though I decided against the 3M “Rocker Schutz” that has gotten a fair amount of exposure among the Jag restorers. The brand was recommended by a body fellow, and it has the added bonus of being a bit less expensive than the 3M product. I asked for “Rocker Schutz” by name, and we shuffled off through the shelves of stock to get it. He asked what I was going to use it on, and I told him. He said, “Let me show you something else” and we went off into the depths of the place. “I sell twenty times more of this stuff than the 3M,” he said. Now, I’m sure that “Rocker Schutz” is great stuff, but I figured I’d give this a try. The nice thing was that I didn’t have to shell out $60 USD to get the special 3M spray gun for this product. It uses a more generic aluminum low pressure gun, and the bottles of the product attach directly to the gun. I’ll provide more information later when I have a chance to use it on the underside of the car.
The body shell is virtually complete and ready for paint, so we’ll have to turn our attention to other things. That is a bit of a relief, to tell the truth. I am thinking that I will begin to study the IRS, and perhaps make some room in the garage to begin working on it. (The garage is a huge mess, I’m afraid.)
To close things up, a couple more photos: